
 Share
Share
 Print
Print
|
|
|
|
|
A/C Initial Template Load
The A/C Initial Template Load is used to load aircraft data into the system where a master template has already been created. The data being loaded is specific and will be seamlessly imported into the system.
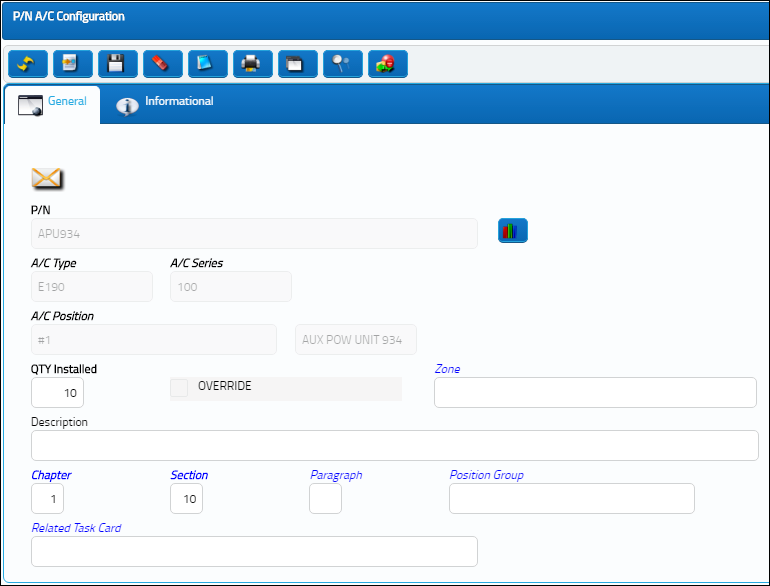
This option is only used when an aircraft is added to the system and the template function is selected. The A/C Template Load will populate the Aircraft Initial Template via Technical Records/Update for the given A/C. The system knows the Part Numbers and positions that need to be installed for the Aircraft Type/Series from the A/C P/N Configuration (defined in Settings/Update/P/N Master). For a listing of the parts to be installed, users may go to Settings/ Update/ Aircraft Type and Series/ A/C PN Configuration button.
In the A/C Initial Template Load, the user may enter Serial Numbers for the given Part Numbers and positions listed in this screen; the data that is entered in the A/C Initial Template Load is the Serial Number.
Note: Data can be saved as the user moves forward, i.e. some data is entered, saved, and the remaining data can be entered at a later point in time.
Select the aircraft to load the data for. Select the Find ![]() button. The following screen will appear, with the Part Numbers loaded:
button. The following screen will appear, with the Part Numbers loaded:
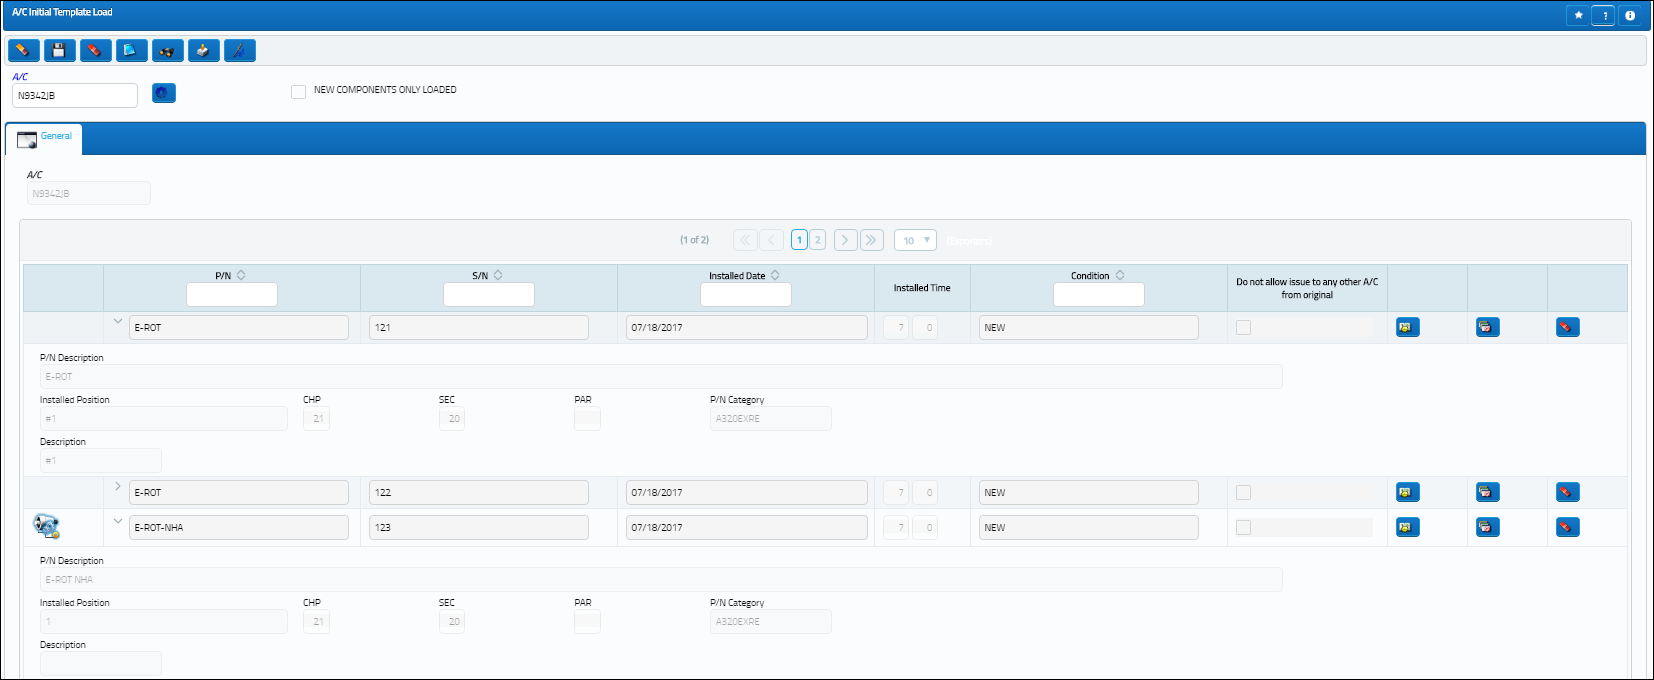
The following information/options are available in this window:
_____________________________________________________________________________________
A/C
The individual aircraft tail number. Aircraft being added to the system.
New Components Only Loaded checkbox
Select this checkbox to default all components to new. P/N Controls will be created for all components that are loaded of applicable and and as defined in the P/N Master for the component(s). This checkbox also pertains to customers who are buying new aircraft and want the P/N Control Actuals to be equivalent to the A/C Total Times.
P/N
The Part Number reference for the aircraft part.
S/N
The Serial Number for the specific serialized part.
Installed Date
The Date that the part was Installed.
Installed Time
Time of part installation.
Condition
The condition of the part.
Note: The condition for all parts can be set by selecting the Set Blank Conditions ![]() button. Enter a condition. Upon exiting the window, the system will set the selected condition to all parts. This is especially helpful when buying a new aircraft that has only new parts installed.
button. Enter a condition. Upon exiting the window, the system will set the selected condition to all parts. This is especially helpful when buying a new aircraft that has only new parts installed.
Installed Position
The position on the aircraft of the installed part.
P/N Description
The description of the part.
CHP/SEC/PAR
The ATA chapter/section/paragraph, as applicable.
P/N Category
The category of the part as defined in Settings/ Explorer/ System Transaction Code Explorer/ Settings/ P/N Category (e.g. Rotable, Consumable, Repairable) and entered for the particular part in the P/N Master.
Do not allow issue to any other A/C from original checkbox
By selecting this box, the user can prevent the P/N from being issued to any other A/C.
P/N E/C ![]() button
button
By pressing this button, a screen with all E/Cs that are effective to the applicable aircraft will be opened. It allows the user to view the status of the EC, view or edit the schedule for this specific aircraft (![]() button) and view compliance information (
button) and view compliance information (![]() button).
button).
NLA ![]() button
button
Select the NLA ![]() button to view all corresponding Next Lower Assemblies. If there are sub NLAs associated to the NLA, a tree view is displayed. Select the Expand All
button to view all corresponding Next Lower Assemblies. If there are sub NLAs associated to the NLA, a tree view is displayed. Select the Expand All ![]() button to view all sub NLAs.
button to view all sub NLAs.
The tree view is shown below. Select any of the hyperlinks to view the P/N Inventory Next Lower Assembly window.
The system displays the window as shown below. Populate the mandatory fields and select the Save ![]() button. Once the change is saved, select the P/N Control
button. Once the change is saved, select the P/N Control ![]() button.
button.
The system displays the P/N Inventory Control window. For information regarding this window, refer to the Control Button, via Inventory Transaction Detail Buttons which can be found in the Inventory Training manual.
The system displays the P/N N/L/A Creation window when the N/L/A hyperlink is selected. For more information refer to the P/N N/L/A Creation window via the Technical Records Training Manual.
P/N Control ![]() button
button
Enter the reset times for Part Number control items in the pop-up window (i.e. the time the requirement was performed last). The P/N Control must be entered to save the individual Serial Number. For additional information related to the P/N Inventory Control ![]() button, refer to Receiving a Time Controlled Part via Order Receiving section of the Receiving Training manual.
button, refer to Receiving a Time Controlled Part via Order Receiving section of the Receiving Training manual.
Inventory Control Update ![]() button
button
This button is only active after saving the Serial Number and only available in the above window. Users may correct the P/N Inventory Controls as required if an error is found. Once the Template is closed, then all P/N Inventory Controls must be corrected via the P/N Control Authorization (Technical Records/Update).
Delete ![]() button
button
Delete the part number from the initial load table.
Note: When this button appears alongside the Serial Number, if selected, the record is deleted and necessary fields are then available for re-entry of the correct Serial Number.
_____________________________________________________________________________________
It is possible to enter most of the Serial Numbers, and exit the option until the rest of the data can be entered. Part Numbers can be updated (if required) and Serial Numbers entered, along with the installation date and time and P/N Controls.
Select the Engineering Control ![]() button. The system displays the following screen:
button. The system displays the following screen:
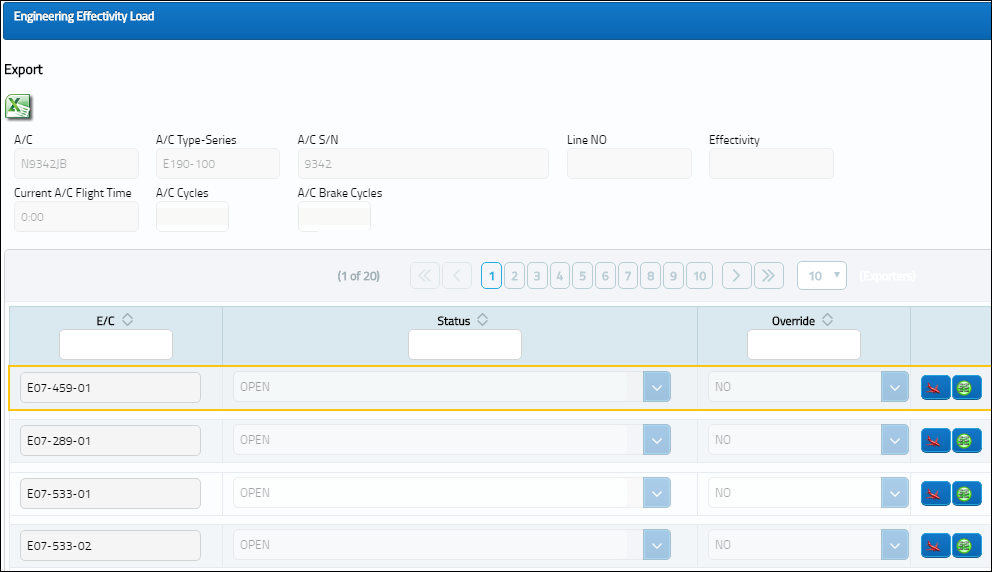
In this screen, it is important that all the A/C E/C's last Compliance Record be entered prior to the closing and updating of the template. Once the template has been closed and updated, this screen will no longer be available for data entry.
The following information/options are available in this window:
_____________________________________________________________________________________
A/C
The individual aircraft tail number.
A/C Type/Series
The Aircraft Type and Series/Fleet assignment.
A/C S/N
The Aircraft's Serial Number which is provided by the manufacturer. This serial number is like a registration number, but it is not dependent on a country code and therefore never changes.
Line No.
A number provided by the manufacturer that works like a serial number. Some TraxDocs assign effectivity via this line number.
Effectivity
This field provided by the manufacturer and functions like a Line Number, only it is specific to engineering effectivity (like a reference to Service Bulletins, for example). It is entered through the A/C Master and is only informational.
Current A/C Flight Time
The current number of accumulated aircraft Flight Hours and Minutes as of the current Time As Of date.
A/C Cycles
A/C Total Flight Cycles.
A/C Brake Cycles
A/C Total Brake Cycles.
E/C
The Engineering Control that specifies aircraft or component scheduled maintenance intervals.
Status
Status of Effectivity against the A/C.
Override
Status of Schedule Override.
Effectivity ![]() button
button
Opens A/C Effectivity Screen where the user may override the blanket schedule of the EC against the A/C.
Compliance ![]() button
button
This button must be utilized before the Effectivity button. This button allows the user to enter the last Compliance Record for the A/C EC.
Compliance History ![]() button
button
This button is only active after saving the last Compliance Record and is used to view the last Compliance Record entered.
_____________________________________________________________________________________
Note: The Import ![]() button can be utilized to quickly import parts and P/N Controls into the system that are currently installed on the selected aircraft.
button can be utilized to quickly import parts and P/N Controls into the system that are currently installed on the selected aircraft.
The Notes ![]() button is available to include relevant information.
button is available to include relevant information.
Once all the data is entered, click on the Save ![]() button. The system will provide the following prompt:
button. The system will provide the following prompt:

Select No to cancel.
Select Yes to save, update, and close the template.
A prompt will appear.
Select No to cancel.
Select Yes to apply the warranty to all A/C Components.
Note: The A/C Component Warranty information is entered on the Optional tab of the A/C Master.
Once completed, the A/C Components may be viewed in the A/C Explorer (via Technical Records/Explorer).
Multi Company Functionality:
The Company that the A/C Initial Template Load is created for can be registered against the Aircraft that the parts were loaded into. To do so, the Company field must be populated in the A/C Master, Other 1 tab. Once the A/C Initial Template Load is completed, the Company name is listed in the Inventory Transaction window for the part. For more information, refer to the Multi Company Functionality.
The Company must be entered in the A/C Master, Other 1 tab.

Note: For more information refer to the A/C Master, Other 1 Tab via the Settings Training Manual.
The A/C Initial Template Load is created for the above A/C.
From the Inventory Transaction window, notice that the Company listed against the initial loaded parts is the same one listed against the Aircraft via the A/C Master, Other 1 tab.
Share
Print
|
©1997-2024 Trax USA Corp. All rights reserved. This manual may not be copied, photocopied, reproduced, translated, or converted to any electronic or machine-readable form, in whole or in part, without prior written approval from Trax USA Corp. |
|