
 Share
Share
 Print
Print
|
|
|
|
|
The EIPC Doctype creates P/Ns and vendor codes while also setting effectivity and P/N interchangeability as it relates to engines. The information provided is tied to the applicable OEM.
When uploading a document into TraxDoc, the file that is being uploaded must be in a location where the eMRO server will recognize it. See below instructions:
- The IT department on the user side must select a directory to work as a repository for all the OEM manuals that would be uploaded to eMRO via the TraxDoc module.
- This directory must be accessible from the application server (Wildfly).
- Create a way for users to provide the OEM manual revisions to be placed in the repository.
- The path for the repository directory will be defined by the traxdoc_manual variable on the data.source.properties file. This can be found under the application server (/%WILDFLYHOME%/deployments/emro.war/WEB-INF/classes/resources/).
SaaS customers should refer to the instructions outlined in this document in iCentral: SaaS - How to Upload TraxDoc Manuals.
From the TraxDoc Document window, select the Generate/Update Data ![]() button.
button.
The following information/options are available in this window:
_____________________________________________________________________________________
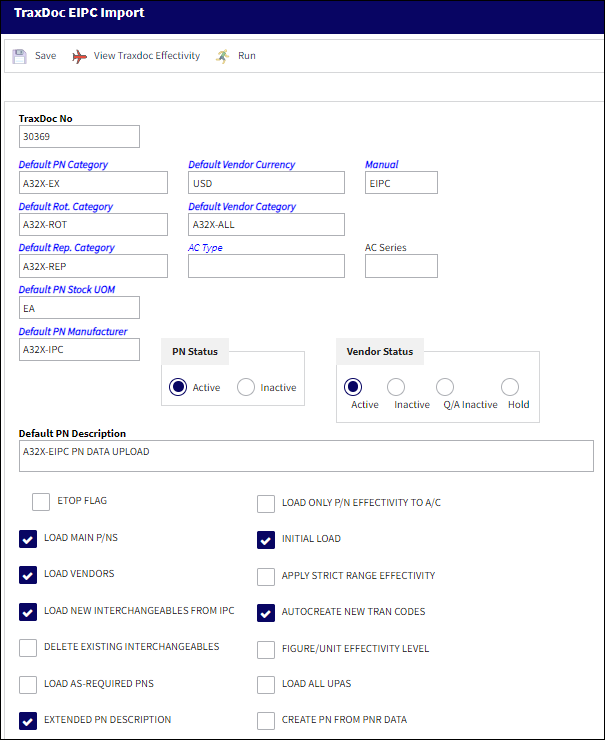
TraxDoc No.
The TraxDoc Document ID number, which is automatically generated by the system.
Default PN Category
This P/N Category field in this window is referring to only Expendable and Consumable part numbers. This determines how the system will handle this part. If the Category entered is Expendable or Consumable, the system will be expecting either an Expendable or Consumable number for every item in the system for this part number.
Default Vendor Currency
This is the default vendor currency.
Note: The user must enter default values to place in these field in case the IPC does not contain data for them.
Manual
The manual to be applicable to associated E/Cs / T/Cs.
Default Rot. Category
This P/N Category field in this window is referring to only Serialized part numbers. This determines how the system will handle this part. If the Category entered is Serialized, the system will be expecting a Serialized number for every item in the system for this part number.
Note: The user must enter default values to place in these fields in case the IPC does not contain data for them. Parts for these categories are identified by the ITEM tag. The system assumes that a part is Serialized if the IPC lists positions for the part.
Default Vendor Category
This is the default vendor category.
Note: The user must enter default values to place in these field in case the IPC does not contain data for them.
Default Rep. Category
This P/N Category field in this window is referring to only Repairable part numbers. This determines how the system will handle this part. If the Category entered is Repairable, the system will be expecting a Repairable number for every item in the system for this part number.
Note: The user must enter default values to place in these field in case the IPC does not contain data for them.
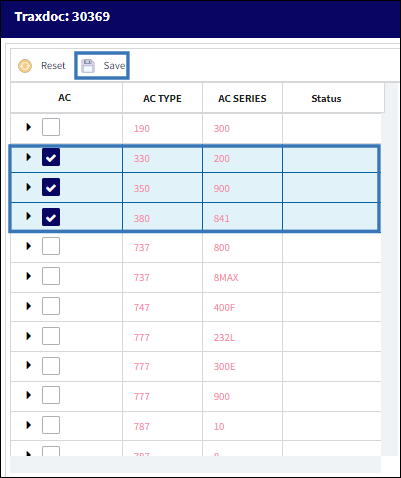
A/C Type/Series
The Aircraft Type and Series/Fleet assignment.
Default PN Stock UOM
The ATA code for Unit Of Measurement (or internal code if preferred). The Order UOM differentiates by Stock UOM a unit of conversion may be defined in the UOM code which will automatically convert the Order UOM to the Stock UOM at receiving.
Default PN Manufacturer
The Manufacturer or main Vendor for this part. The Vendor must be flagged in the Vendor Master as a Manufacturer to populate this field.
Note: The user must enter default values to place in these field in case the IPC does not contain data for them.
PN Status radio buttons
Controls the Status of the P/N.
Active - Select this radio button to make the part number(s) active.
Inactive - Select this radio button to make the part number(s) inactive.
Vendor Status radio buttons
Active - Select this radio button to indicate that the Vendor associated with supplying the part being imported is an Active Vendor.
Inactive - Select this radio button to indicate that the Vendor associated with supplying the part being imported is an Inactive Vendor.
Q/A Inactive - Select this radio button to indicate that the Vendor associated with supplying the part being imported is in Q/A Inactive Status.
Hold - Select this radio button to indicate that the Vendor associated with supplying the part being imported is on Hold Status.
Default PN Description
The description of the part number.
ETOPS Flag checkbox
Select this checkbox to indicate that the part is relevant to ETOPS operations. When the ETOPS checkbox is selected, the ETOPS field appears. Specify the ETOPS rating for the aircraft in this field.
Load Only P/N Effectivity to A/C checkbox
Select this checkbox to load only parts that are effective to the aircraft.
Load Main P/Ns checkbox
Select this checkbox to load main P/Ns.
Initial Load checkbox
Select this checkbox to initial load P/Ns. When selected the import will update the P/Ns regardless of the CHG Tags which are in the SGMLs. There are New, Unchanged, Delete and Revision CHG tags in the SGML. If the checkbox is selected it will check the P/N Master for the P/N and update existing data from the import. If the P/N must be a Main it will create the NEW Main P/N (MPN), if it doesn't already exist. If it exists as a main it will only update the records as explained. If it exists as an interchangeable P/N to another P/N but must be a MPN, it will change the both-way interchangeable P/N into a Main P/N, making it a one way Part Number to the MPN it was once both-way interchangeable with, and it will apply its own IPC and supplement documentation.
Load Vendors checkbox
Select this checkbox to load the vendors that are associated to supplying the part to which the import is being conducted.
Apply Strict Range Effectivity checkbox
When checked, imported Task Cards/Engineering Controls will be made effective to all Aircraft Type/Series, regardless of whether or not tail-level effectivity is specified in the manual. Positions, Zones, Panels, References, etc. will also be created for all type/series. If unchecked, effectivity will only be created for those type/series that have a least one effective Aircraft specified in the manual.
Load New Interchangeables from IPC checkbox
Select this checkbox to load any association to Interchangeable parts for the part to which the import is being conducted.
Autocreate New Tran Codes checkbox
Some of the Task Card information provided in OEM manuals is controlled by Tran codes (i.e. Task Card types, areas, and skills). Selecting this checkbox will automatically create a Tran code record for any values found in the manual. If this box is not checked, the fields will still be set in the Task Card, but will have to be changed manually when working with the task card. This option is unchecked by default.
Delete Existing Interchangeables checkbox
Select this checkbox to delete the associated Interchangeable parts that existed within the P/N Master prior to the new import being conducted for the part.
Note: This option is not intended to be used regularly when importing, but as an occasional 'clean-up' option.
Figure/Unit Effectivity Level checkbox
When this checkbox is selected, the system will also take into consideration the effectivity from the Figure and Unit from the AIPC SGML. If this checkbox is selected and the P/N effectivity is not specified, the system will assign the Figure Level effectivity to the P/N. If the Figure Level effectivity is not specified, the system will assign the Unit Level effectivity to the P/N. If the Unit Level effectivity is not specified, the system will then assign the TraxDoc effectivity to the P/N.
When the checkbox is deselected, the system will skip the Figure and Unit Level effectivity and assign the TraxDoc effectivity to the P/N (when P/N effectivity is not specified in the manual).
Load As-Required PNs checkbox
When this checkbox is selected, the system will also process P/Ns that are flagged 'As Required' within the AIPC SGML, and the UPA will be set to the value of 1. When this checkbox is deselected, the P/Ns that are flagged as 'As Required' will be ignored.
Load All UPAs checkbox
Select this checkbox to have the system create alphanumeric P/Ns in the P/N Master.
Extended PN Description checkbox
When this checkbox is selected, the short and long P/N Description (provided in the AIPC) will be combined and be used for the P/N Master Description.
Create PN From PNR Data checkbox
Select this checkbox to create a PN from the PNR Data associated with the import.
_____________________________________________________________________________________
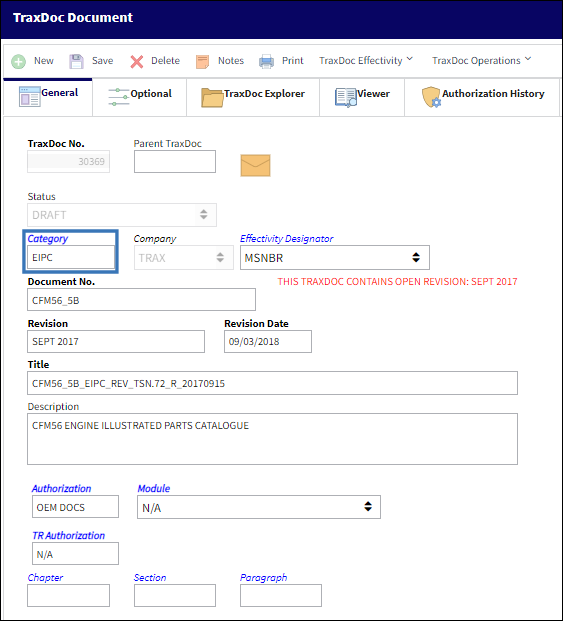
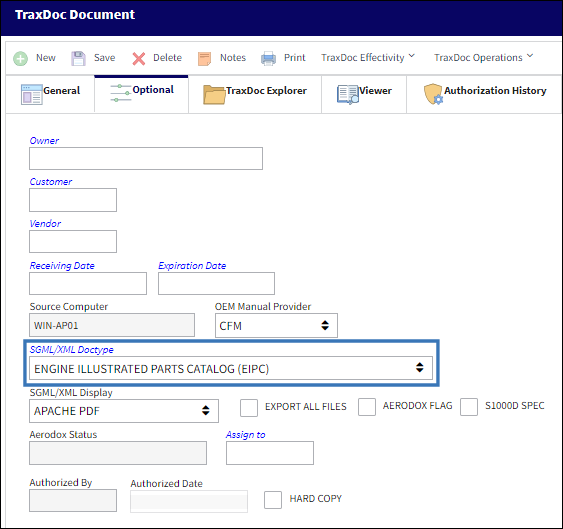
Setting up the Engine Illustrated Parts Catalog (EIPC) Doctype
When setting up the EIPC TraxDoc, ensure that the category is set to EIPC.
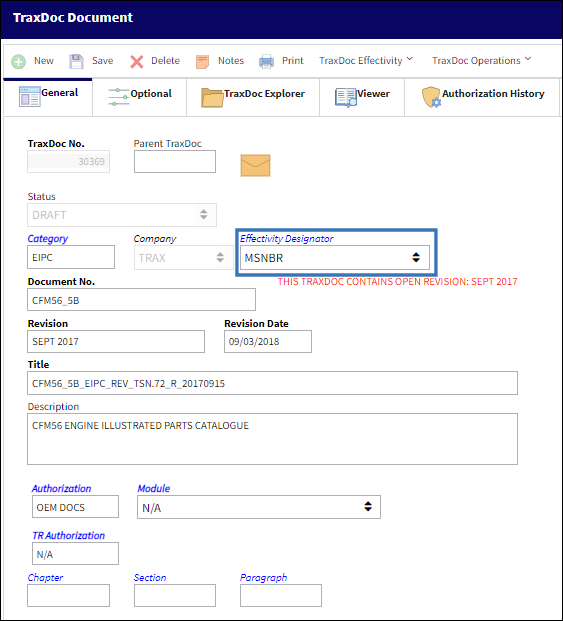
Set the Effectivity Designator to MSNBR.
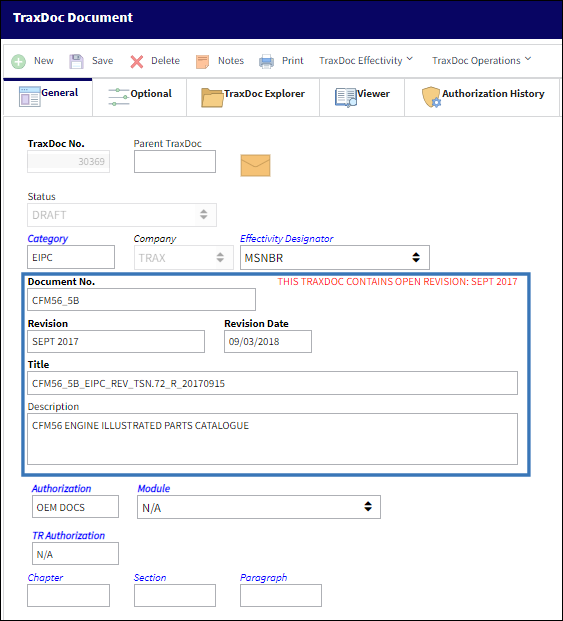
Populate the Document No., Revision Number, Revision Date, Title, and Description.
Establish the appropriate Authorization and select the appropriate Module.

In the Optional Tab, select the appropriate OEM Manual Provider.
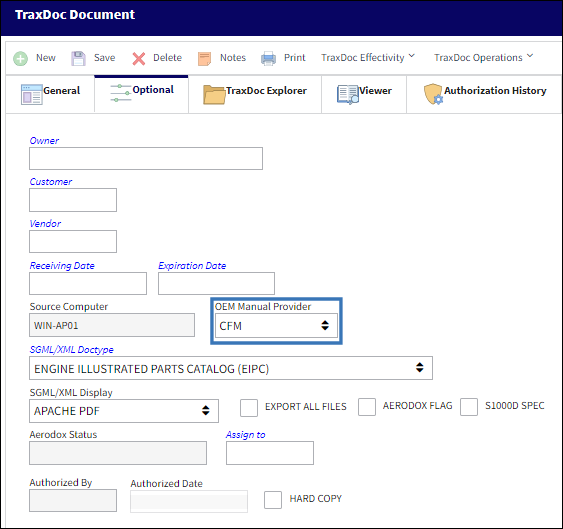
Set the Doctype to Engine Illustrated Parts Catalog (EIPC).
Note: Select the Aerodox Flag to ensure that the manual and data are viewable in the Aerodox iOS application.
Establish effectivity via the Trax Doc Effectivity ![]() button.
button.
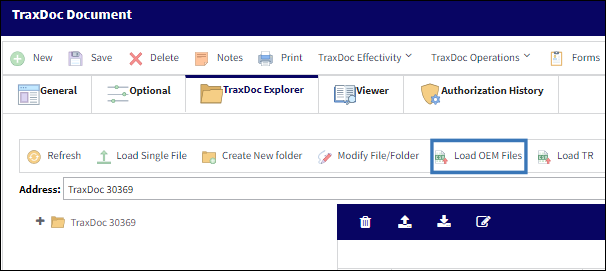
Loading the Engine Illustrated Parts Catalog (EIPC) Doctype
In the TraxDoc Explorer Tab, select the Load OEM ![]() button.
button.
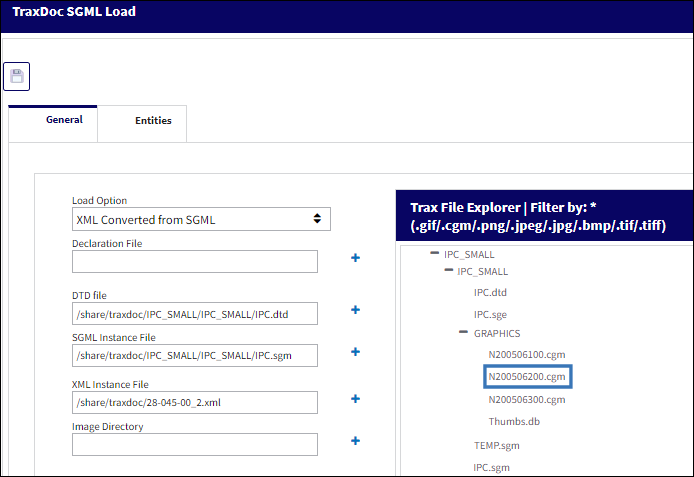
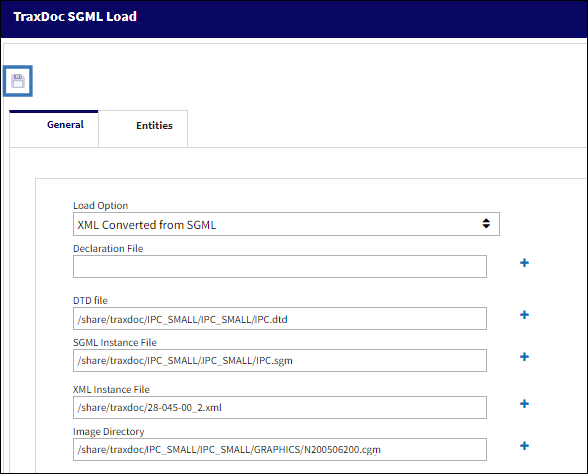
The TraxDoc SGML Load window is displayed. In the General tab, Select the DTD field.
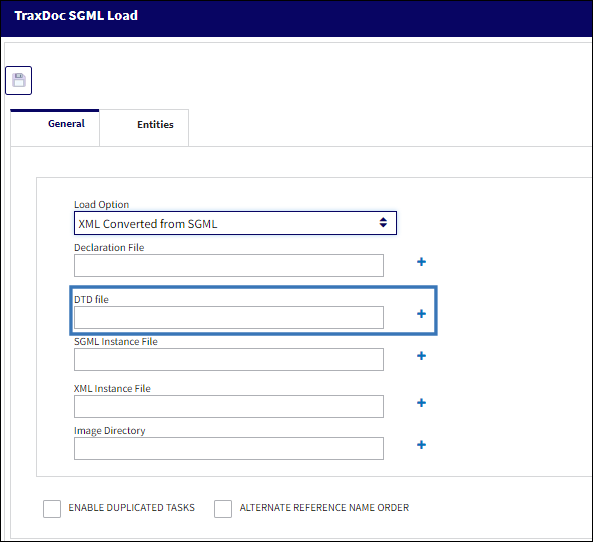
Expand the file tree and select the appropriate DTD file.
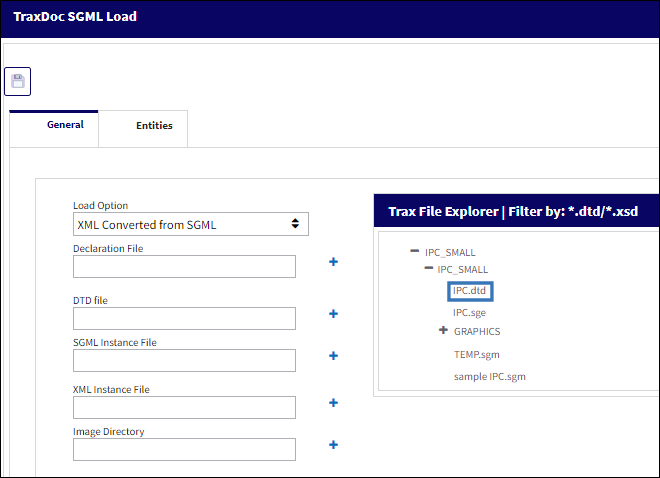
Upon selecting the DTD file, the SGML and XML Instance File paths are automatically populated.
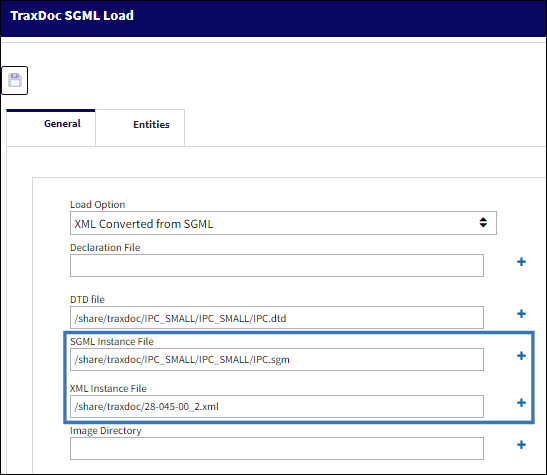
Select the Image Directory field.
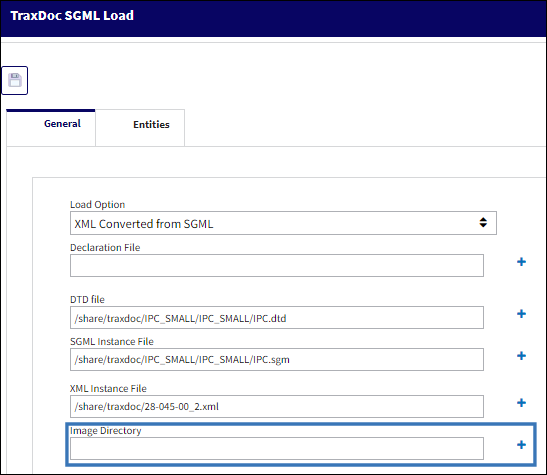
Expand the file tree and select the appropriate CGM folder.
Note: In some instances, an entities file path will need to be established. To establish an entities path, navigate to the Entities tab and select the New ![]() button. Then, expand the file tree and select the appropriate SDL file.
button. Then, expand the file tree and select the appropriate SDL file.
Once all file paths have been populated, select the Save ![]() button.
button.
After saving, the TraxDoc will begin loading into the system.
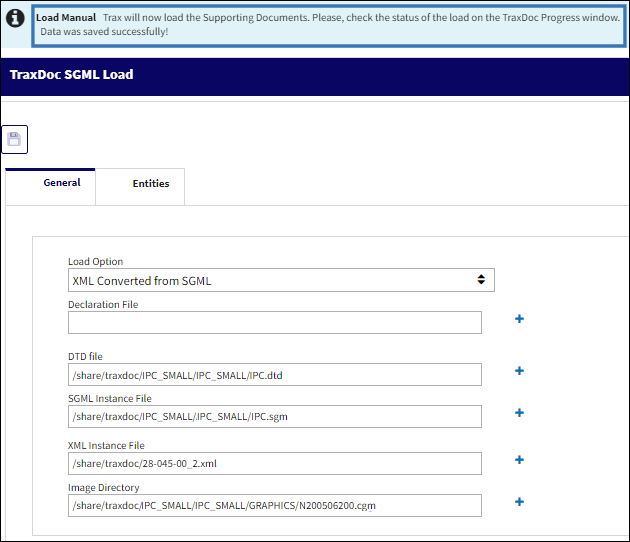
The load progress can be viewed within the TraxDOc Progress window via the Navigation Panel. For more information, refer to TraxDoc Progress.
Importing the Engine Illustrated Parts Catalog Doctype
To Import the Engine Maintenance Manual Doctype, select the Generate/Update Data ![]() button within the TraxDoc Explorer Tab.
button within the TraxDoc Explorer Tab.
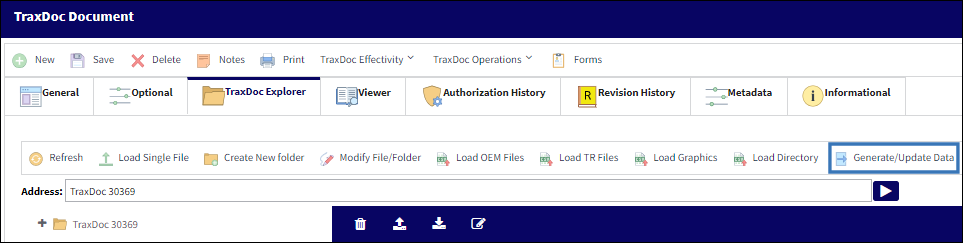
The TraxDoc EIPC Import window is displayed.
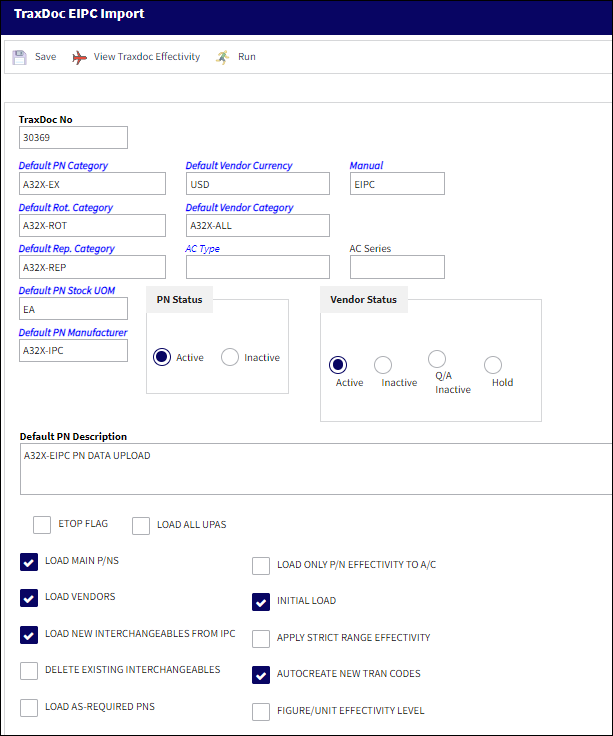
Populate the appropriate fields and select the Run ![]() button to being the generation process.
button to being the generation process.

The generate progress can be viewed within the TraxDoc Progress window via the Navigation Panel. For more information, refer to TraxDoc Progress.
Share
Print
|
©1997-2024 Trax USA Corp. All rights reserved. This manual may not be copied, photocopied, reproduced, translated, or converted to any electronic or machine-readable form, in whole or in part, without prior written approval from Trax USA Corp. |
|