
 Share
Share
 Print
Print
|
|
|
|
|
Physical Inventory Generation
The Physical Inventory Generation will issue a list with the expected stock quantities as calculated based on inventory transactions booked in the system (e.g. Receiving, Transfers, Scrap, etc.).
This list can be generated using certain filter criteria, e.g. a list for all parts in a location, only for one part, a range of bins, a part category.
It is recommendable that the list be printed in order to assist with the physical part counting (see next step).
Note: Once this setup has been completed, do NOT run the physical inventory adjustment without entering the Physical Inventory Counts (described in the next step). The system will automatically set all non-serialized items to zero.
Only one generation can be produced per location per day. If the user runs the generation again for the same day and location, you can add to the existing count, regenerate the count again, or cancel the selection.
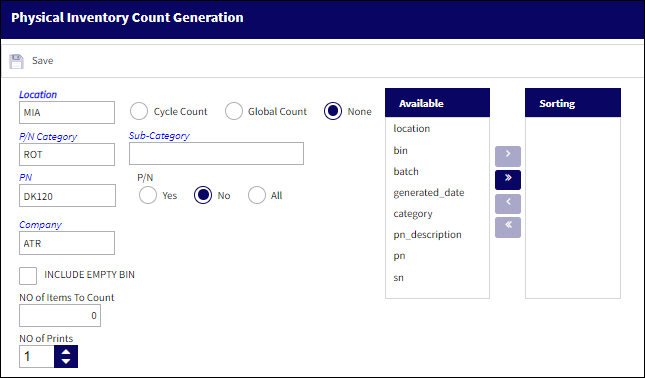
The following information/options are available in this window:
_____________________________________________________________________________________
Location
The Location for maintenance events, inventory stores, orders, transactions, or training events.
Note: When Switch ![]() INVCOUNTALL is set to Yes, the Location field will not be mandatory and multiple locations may be selected. For additional information refer to Switch
INVCOUNTALL is set to Yes, the Location field will not be mandatory and multiple locations may be selected. For additional information refer to Switch ![]() INVCOUNTALL via the Inventory Switches Manual.
INVCOUNTALL via the Inventory Switches Manual.
Cycles Count radio button
Select this radio button to run the Physical Inventory Generation only for inventory items that have been assigned a Cycle Count Code. Parts are assigned a Cycle Count Code. The Cycle Count Code is assigned to a P/N to determine the frequency at which that part is counted at your facility.
Note: When Switch ![]() INVCOUNTALL is set to Yes and the Cycle Count radio button is selected, the Location field will not be mandatory allowing the count to generate for multiple locations. For additional information refer to Switch
INVCOUNTALL is set to Yes and the Cycle Count radio button is selected, the Location field will not be mandatory allowing the count to generate for multiple locations. For additional information refer to Switch ![]() INVCOUNTALL via the Inventory Switches Manual.
INVCOUNTALL via the Inventory Switches Manual.
Global Count radio button
Select the Global Count radio button to run the Physical Inventory Generation for all parts in one or all locations. This option will allow the count for parts that are in transit out of inventory or have a status of pending inventory, pending repair, and/ or pending technical records.
None radio button
Select the None radio button to run the Physical Inventory Generation for all parts in inventory and in transit with a status of pending inventory, pending technical records and/ or pending repair. This count option will only generate for one location.
P/N Category
The category of the part as defined in Settings/ Explorer/ System Transaction Code Explorer/ Settings/ P/N Category (e.g. Rotable, Consumable, Repairable) and entered for the particular part in the P/N Master.
Sub-Category
The Sub Category for each part.
P/N
The Part Number reference for the aircraft part.
P/N radio buttons
Select this checkbox to include all P/Ns in the count.
No - When the No button is selected, the count will include main P/Ns only.
All - When the All button is selected, the count will include One-Way and Both-Way Interchangeable P/Ns.
Yes - When the Yes button is selected, the count will include Both-Way Interchangeable P/Ns only.
Bin From/To range
Choose a range of bins from which you will obtain the count.
Note: When switch INVCOUNTALL is set to Yes, the Bin range fields are available for Cycle Count, Global Count, and None (above). When set to No, the Bin range is available for Global Count and None, but notfor Cycle Count. For more information refer to Inventory switch INVCOUNTALL.
Company
Select a company to have all P/N's in that company's inventory appear in the Physical Inventory Count Print.
Note: For more information, refer to the Multi Company Functionality.
Number of Prints
Select the number of times the count is to be performed.
Include Empty Bin
Check to indicate that the counts should include all bins within the specified range, even if the bin is empty. If a list of the results of the count is printed upon completion of this step, empty bins will appear with a count of zero (0).
Add P/N Information
Will appear when the Include Empty Bin Checkbox is checked. Check to indicate that information regarding the Part Numbers with zero included in an empty bin should be added to the list of counts that is printed upon completion.
No of Items to Count
Enter the number of items to count at the designated inventory location. The system will select the parts through a first in - first out method. The parts that have been brought into inventory first will have priority over all other parts for that specified location.
_____________________________________________________________________________________
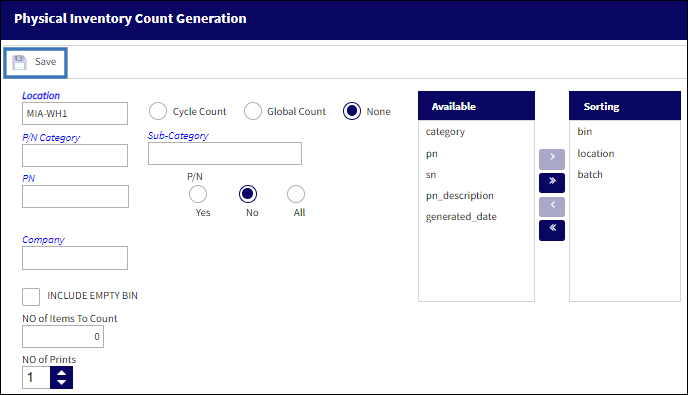
If more than one count is generated for the same location, the following Transaction Selection window is displayed. The user can add to the previous generated count, clear the previous count, or cancel the request.
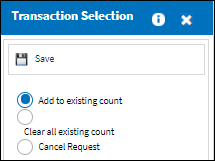
Once an option is selected, save the changes.
A report will be generated, showing all items matching the filter settings selected.
Serialized items will be included with their serial number.
Note: The Count column to the right. Once the report is printed, this column can be used to enter the quantity that is actually counted during the Physical Inventory Count step.
You can re-print the count report if you require (Inventory/Print/Physical Inventory Print/Physical Inventory Print format).
Once the Physical Inventory Generation has been completed, the Physical Inventory Count can be performed.
Physical Inventory Generation Sorting ![]()
The Available/Sorting tables in the Physical Inventory Count Generation Window are used to sort the records that will be displayed in the generated print.
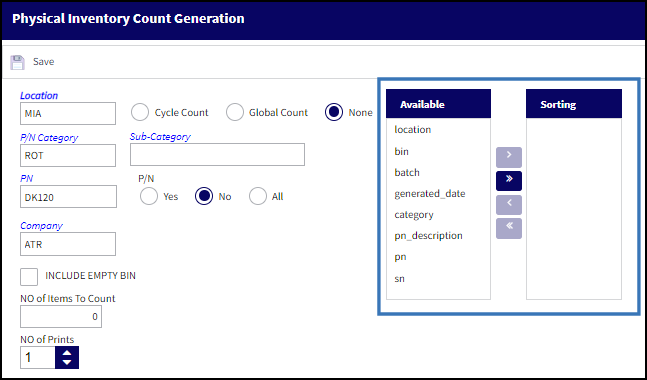
The Available table lists the fields that are included in the Physical Inventory Count Print. To specify which fields should be sorted, the user must select the desired fields and move them to the Sorting table with the arrow buttons. Multiple fields can be selected at once by holding the CTRL key.
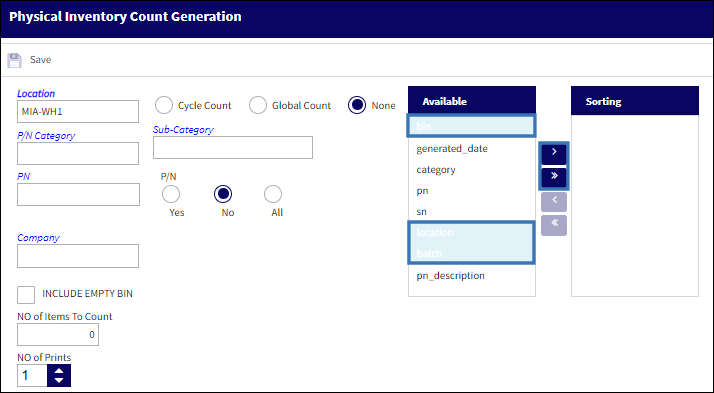
Fields placed in the Sorting table will be sorted in ascending order. Users can continue to add fields to the table or remove them by selecting the fields and using the arrow buttons.
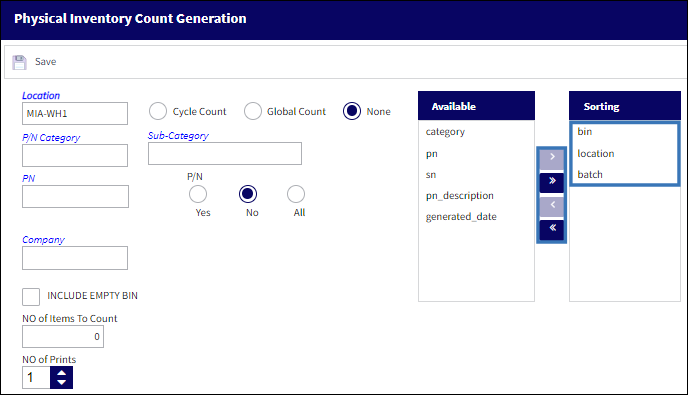
Once the desired fields have been placed in the Sorting table, select the Save button to generate the print. In this instance, the Physical Inventory Count print will be generated with records belonging to the MIA-WH1 location.
In the print, the records are sorted in ascending order per the fields entered in the Sorting table.

![]() Physical Inventory Process
Physical Inventory Process
Share
Print
|
©1997-2024 Trax USA Corp. All rights reserved. This manual may not be copied, photocopied, reproduced, translated, or converted to any electronic or machine-readable form, in whole or in part, without prior written approval from Trax USA Corp. |
|