
 Share
Share
 Print
Print
|
|
|
|
|
P/N Master, Inventory Tab
Select or create the Part Number and then click on the P/N Master, Inventory Tab.
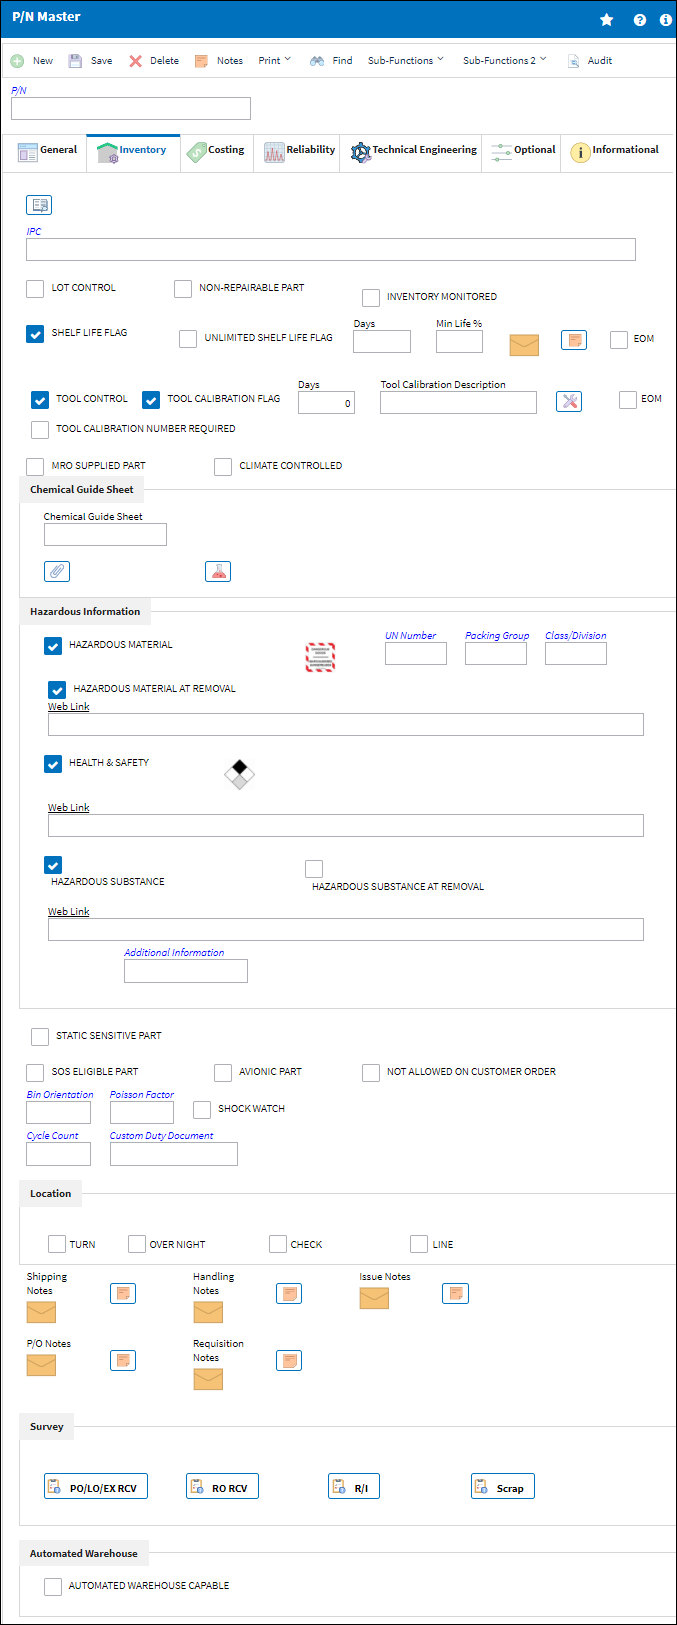
The following information/options are available in this window:
_____________________________________________________________________________________
IPC
Illustrated Part Catalog reference that manufacturers use to illustrate specific parts by sections of the aircraft. The IPC system generally appears in "Chapter, Section, Paragraph (31-41-05)" format. The page number, figure number, and item number is also included. Click into the field to select electronically pre-loaded data as required. Select the IPC button to create IPC references for the P/N. Several references can be created for the same P/N.
![]() Note: Additional column labels detail pertinent information relating to the records available in the IPC Drop Down selection window. Furthermore, related IPC information can be seen via it's respective column in the general P/N Drop Down selection window.
Note: Additional column labels detail pertinent information relating to the records available in the IPC Drop Down selection window. Furthermore, related IPC information can be seen via it's respective column in the general P/N Drop Down selection window.
IPC Reference Preview ![]() button
button
Previews the Illustrated Parts Catalog referenced selection.
Lot Control checkbox
If this Part is Lot controlled from the manufacturer and if checked, it will make the Lot Number required during the receiving function.
Non-Repairable Part checkbox
If checked, users will not be able to place this part on a Repair Order.
Auto S/N Creation checkbox
Check this box if this part requires an automatic S/N creation. This checkbox is designed to auto assign Serial Numbers for parts in the Order Receiving window. This is a useful tool for parts that are handled as non-serialized by the manufacturer, but need to be serialized internally.
Note: This checkbox is only available for serialized parts. The checkbox is not displayed for consumable parts.
Prefix
The prefix field is displayed when the Auto S/N Creation checkbox is selected. Select into the field to select the appropriate Prefix code. This prefix will be added to an auto-generated serial number to distinguish those serial numbers from native serial numbers.
Inventory Monitored checkbox
When the Inventory Monitored checkbox is selected via Inventory Print, only parts where the Inventory Monitored checkbox is selected (via the P/N Master) will appear in the Inventory print.
Shelf Life Flag checkbox
Check if this part is shelf life controlled. If you are receiving a Transferred part (via Receiving/ Update/ Order Receiving) that has an expired Shelf Life, you will be alerted. Please note that this checkbox can not be checked at the same time as the Unlimited Shelf Life checkbox.
EOM checkbox - End Of Month checkbox. With this checkbox checked, the shelf life of a part will be extended to the end of the month of its due date. This checkbox is only available when the Shelf Life Flag checkbox is selected.
Unlimited Shelf Life Flag checkbox
Check if this part has unlimited shelf life. This will flag the parts as shelf life parts and show them on the respective prints. However, it will not show the parts as shelf life due at any point, and the receiving clerks will not be prompted to enter a shelf life due date upon receiving.
Days - This field is displayed when the Shelf Life Flag checkbox is selected. This indicates the maximum number of days of shelf life that the part can be assigned upon receiving.
Min Life % - This field is displayed when the Shelf Life Flag checkbox is selected. The Minimum Life % field displays the minimum life percentage value that the part must have in order to be received into inventory.
Shelf Life Note ![]() button - Used to enter any relevant notes regarding the Shelf Life of the part. This button is only available when the Shelf Life Flag checkbox is selected.
button - Used to enter any relevant notes regarding the Shelf Life of the part. This button is only available when the Shelf Life Flag checkbox is selected.
Tool Control checkbox
In Order for the Tools Check-In and Check-Out functionality (via Inventory/ Update/ Inventory Transaction) to work correctly, this must be checked to indicate the part is a tool. The Tool Calibration checkbox, which indicates whether the tool requires calibration, will appear once the Tool Control checkbox has been checked. The number of calibration days are set in the Days field. These two checkboxes allow reports (via Inventory/ Prints) to be generated to track tools' issuance and calibration (with calibration task description) as required. Only serialized P/Ns can be set up for tool calibration.
Note: The Tool Control checkbox cannot be deselected for tools that are already checked out. If the user tries to do so, the following error will appear:
EOM checkbox - With this checkbox checked, the due date for a Tool Calibration will be extended to the end of the applicable month. This checkbox is only available when the Tool Control checkbox is selected.
Slang Term ![]() - The Slang Term field is used to associate key words or common terminology with a tool. The tool can then be searched for using the Slang Term in the Tools Inventory window. This field is only available when the Tool Control checkbox is selected.
- The Slang Term field is used to associate key words or common terminology with a tool. The tool can then be searched for using the Slang Term in the Tools Inventory window. This field is only available when the Tool Control checkbox is selected.
Tool Calibration Flag checkbox
Check this box to indicate that this Tool requires calibration. This checkbox is only available when the Tool Control checkbox is selected.
![]() This checkbox is security controlled via Settings/ Update/ P/N Master. Although the checkbox may be visible, the user will be unable to select/deselect it without the appropriate security access. For additional information, refer to the Security Explorer via the System Administration Training Manual.
This checkbox is security controlled via Settings/ Update/ P/N Master. Although the checkbox may be visible, the user will be unable to select/deselect it without the appropriate security access. For additional information, refer to the Security Explorer via the System Administration Training Manual.
Tool Calibration Number Required checkbox
Select this checkbox to activate the Tool Calibration Number field when a tool is received. When this checkbox is selected, the Tool Number field will be available via Receiving Inspection and all Inventory related windows. This checkbox is only available when the Tool Calibration Flag checkbox is selected. For additional information regarding the Tool Calibration Number, refer to Repair Order Receiving, General tab, via the Receiving Training Manual.
![]() This checkbox is security controlled via Settings/ Update/ P/N Master. Although the checkbox may be visible, the user will be unable to select/deselect it without the appropriate security access. For additional information, refer to the Security Explorer via the System Administration Training Manual.
This checkbox is security controlled via Settings/ Update/ P/N Master. Although the checkbox may be visible, the user will be unable to select/deselect it without the appropriate security access. For additional information, refer to the Security Explorer via the System Administration Training Manual.
Days - The Days and Tool Calibration Description fields appear with the Tool Calibration Flag checkbox is selected. The maximum number of tool life days that the part can be assigned upon receiving is entered in the Days field. A description for the tool calibration is entered in the Tool Calibration Description field.
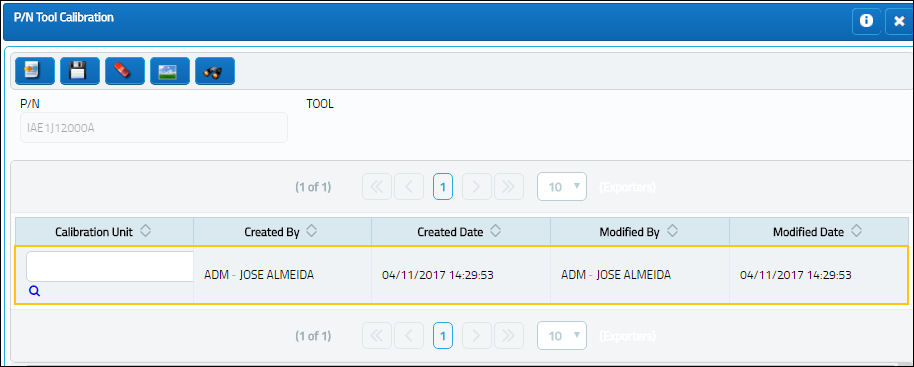
Calibration Parameters ![]() button - The Calibration Parameters button appears when the Tool Calibration Flag checkbox is selected. Select the button and a P/N Tool Calibration window appears which allows the user to enter several calibration codes.
button - The Calibration Parameters button appears when the Tool Calibration Flag checkbox is selected. Select the button and a P/N Tool Calibration window appears which allows the user to enter several calibration codes.
Chemical Guide Sheet
Enter the appropriate description for the hazardous materials that are being used. The user can also select from one of the following three buttons to upload an image or specify information regarding the hazardous material.
Image ![]() button - Select this button to associate an image to the Chemical Guide Sheet.
button - Select this button to associate an image to the Chemical Guide Sheet.
Document Control ![]() button - Select this button to associate a document to the Chemical Guide Sheet.
button - Select this button to associate a document to the Chemical Guide Sheet.
Chemical Sheet ![]() button - Select the Chemical Sheet
button - Select the Chemical Sheet ![]() button specify information regarding the hazardous material. The system displays the Chemical Component List window:
button specify information regarding the hazardous material. The system displays the Chemical Component List window:
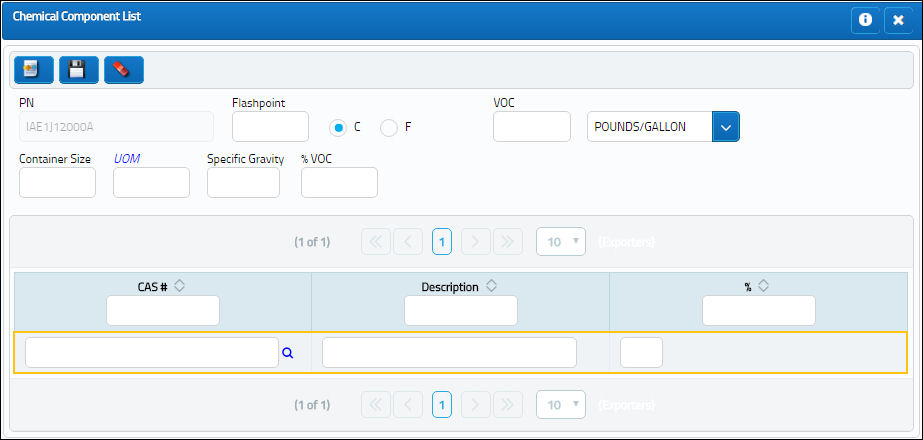
P/N - The part number requiring chemical component information.
Flashpoint - The lowest temperature at which the vapor of a flammable liquid will ignite in air.
Temperature radio button - The temperature scale of the Flashpoint. Select 'C' for Celsius or 'F' for Fahrenheit.
Container Size - The size of the container with the chemical.
UOM - The Unit Of Measurement of the chemical.
Specific Gravity - The specific gravity of a substance is a comparison of its density to that of water. This will allow a calculation to identify a quantity of a chemical used by weight. By using the specific gravity of a chemical we can calculate the weight for any volume used.
VOC - The Volatile Organic Compound.
VOC drop down - The VOC unit of measurement.
% VOC - The percentage of VOC.
CAS # - The Chemical Abstracts Services (CAS) registry number.
% - The Component percentage.
Select the New ![]() button to add more components to the Chemical Component List.
button to add more components to the Chemical Component List.
MRO Supplied Part checkbox
Select this checkbox to classify a part as an MRO (Maintenance Repair Organization) supplied part. When a part with this checkbox selected is associated to a Purchase Order, Requisition, or a Task Card a message appears asking 'Part supplied by MRO. Do you want to continue?' This then activates the MRO supplied part status.
Climate Controlled checkbox
Select this checkbox if the component is required to be placed in a climate controlled bin. If the bin the component is being received/transferred to is not set up as a climate controlled bin, the system will not allow the user to continue with the transaction. If the bin is not set up correctly, the system will display a hard warning. For additional information on how to set up a climate controlled bin, refer to Switch ![]() BINCATLINKPNCAT.
BINCATLINKPNCAT.
Hazardous Information fields
For detailed information on these fields and icons, refer to the below table titled Hazardous Information.
Static Sensitive Part checkbox
Indicates that this is a Static Sensitive Partand is shown in Inventory, Orders, and Packing & Shipping.
SOS Eligible Part checkbox
Save our spares eligible part. Check this box to indicate that this is an SOS Eligible Part. When the part is removed from an aircraft, you can require the system to hold the part for X number of hours (SOS Control Hours) before the part can be placed on a Repair Order. The time is counted from the moment the part is Returned to Stock. Once the number of hours have been met, the system will notify that the part is "Out of SOS Scope" when the SOS Inventory Query is run. If necessary, the part can then be changed to serviceable via Receiving Inspection or it can be placed on a Repair Order. Please refer to the following Inventory module switches for additional information:
 SOS - (SOS Condition) - If set to Yes, the SOS functionality will be applied to all parts instead of only to the parts that have been set as SOS Eligible via the P/N Master. SOS Condition, Date, Hours and Minutes will be mandatory in the Inventory Transaction/Return To Stock window.
- SOSCTLHR - (SOS Control Hours) - If set to Yes, a default number of hours will be used when the part is SOS Eligible. Enter the number of default SOS Control Hours in the Config Number field.
Avionic Part checkbox
Check this box to indicate that this is an avionic part.
Note: Reports can be run on this statistic. The name of the report is "Avionic Parts Print", under Inventory Print.
Not Allowed on Customer Order checkbox
Check this box if the Part Number is not allowed on Customer Orders (sales).
Bin Orientation
Physical orientation of the Bin.
Poisson Factor
The service level required for the part (which is taken into account for Re-Order calculations). The specific calculation rate is set in this System Tran Code option for each level (80%, 90%, 95% etc.). If this field is used, the system will factor this into the Re-Order Levels. See the System Tran Code (Poisson Factor) Section for additional information. The Poisson Factor field must contain a valid code in Order for the system to make correct Re-Order Level calculations. If the Poisson Factor field is left blank, the system will not make a calculation for that particular P/N. Alternatively, the user may prefer the set-up re-order levels in Inventory Levels. For additional information, please refer to the Inventory Level button section of this manual.
Shock Watch checkbox
Select for parts that are fragile and can be damaged if dropped.
Cycle Count Code
The method to be used when counting this part during the periodic Inventory counts at your facility. Cycle Count Codes are used to determine the frequency at which specific P/Ns are counted at your facility during the Physical Inventory Procedure. Once a part has been assigned a Cycle Count Code, that part will be counted at the appropriate frequency when performing the Physical Inventory Procedure. When using the Physical Inventory Generation option, if you select the “Cycle Count” checkbox, the list will only display parts that are associated with a Cycle Count code. Please refer to the Inventory manual for information regarding performing the Physical Inventory Procedure. Please refer to the Physical Inventory Generation via the Inventory Training manual for additional information regarding performing the Physical Inventory Procedure. Please refer to the Settings manual, Special System Transaction Codes section for additional information regarding setting up the Cycle Count Code if required.
Custom Duty Document
Document used to verify that the part was accepted by customs.
![]() Note: This field supports up to 20 characters.
Note: This field supports up to 20 characters.
Do Not Display P/N Total Times checkbox
When selected, the P/N Total Times fields are not displayed in the Inventory Detail window for this part. For more information refer to Inventory Transaction Detail, General Tab via the Inventory Training Manual.
Shipping Notes
Select the Shipping Notes ![]() icon to enter notes that will appear in association with this part on appropriate printed documents throughout the system (ex. Packing and Shipping documents and Picklist Print).
icon to enter notes that will appear in association with this part on appropriate printed documents throughout the system (ex. Packing and Shipping documents and Picklist Print).
Handling Notes
Select the Handling Notes ![]() icon to enter notes that will appear in association with this part on appropriate printed documents throughout the system (ex. Packing and Shipping documents and Picklist Print).
icon to enter notes that will appear in association with this part on appropriate printed documents throughout the system (ex. Packing and Shipping documents and Picklist Print).
Issue Notes
Select the Issue Notes ![]() icon to enter notes that will appear in association with this part on appropriate windows throughout the system (Manual Issue, Express Issue, Express Issue Multi, and Picklist Issue).
icon to enter notes that will appear in association with this part on appropriate windows throughout the system (Manual Issue, Express Issue, Express Issue Multi, and Picklist Issue).
P/O Notes
Select the P/O Notes ![]() icon to enter notes that will appear in association with this part on appropriate windows throughout the system. In P/O Detail, a new tab will appear.
icon to enter notes that will appear in association with this part on appropriate windows throughout the system. In P/O Detail, a new tab will appear.
Note: These notes will appear in the P/O Print whenever this part is purchased through a Purchase Order.
Requisition Notes
Select the Requisition Notes ![]() icon to enter notes that will appear in association with this part on appropriate windows throughout the system. In Requisition Detail, a new tab will appear.
icon to enter notes that will appear in association with this part on appropriate windows throughout the system. In Requisition Detail, a new tab will appear.
Location checkboxes
These checkboxes refer to the Inventory Optimization (Rotable) functionality which allows users to coordinate inventory based on resources in the selected Location instead of via the selected part through the P/N by Location ![]() button. The Location checkboxes from the Location window correspond to Part Numbers that have the same Location checkboxes selected in the P/N Master, Inventory tab. From the Inventory Optimization (Rotable) window, once the P/N by Location
button. The Location checkboxes from the Location window correspond to Part Numbers that have the same Location checkboxes selected in the P/N Master, Inventory tab. From the Inventory Optimization (Rotable) window, once the P/N by Location ![]() button is selected and the given Location is entered, the corresponding P/Ns will appear. The Location checkbox options are as follows: Turn, Over Night, Check, and Line. Multiple checkboxes can be selected.
button is selected and the given Location is entered, the corresponding P/Ns will appear. The Location checkbox options are as follows: Turn, Over Night, Check, and Line. Multiple checkboxes can be selected.
Survey Buttons
Refer to the below table for information regarding the Survey functionalities.
Automated Warehouse Fields
Refer to the below table for information regarding the Automated Warehouse functionalities.
_____________________________________________________________________________________
Hazardous Information:
The following information/options are available in this window:
_____________________________________________________________________________________
Hazardous Material checkbox
Select to classify this part as a hazardous material. A hazardous material is classified as a solid. When this checkbox is selected, the UN Number and Web Link fields to the right of the checkbox are activated for data entry. The Hazardous Material at Removal checkbox is also available when this checkbox is selected.
Note: When sending a hazmat part through Packing and Shipping, the 'No Hazmat Allowed' checkbox from the Ship Via transaction code indicates if the freight forwarder can or cannot ship a part that has the Condition Hazmat checkbox selected. For more information, refer to Ship Via in the Packing Shipping Transaction Code Manual.
Class/Division ![]() icon
icon
A Class/Division ![]() icon will appear next to the Hazardous Material checkbox depending on the Class/Division transaction code selected in the Class/Division field to the right of the Hazardous Material checkbox. This transaction code can be set up via Settings/ Explorer/ System Transaction Code/ Hazardous Materials Class/Division. Once set up against a P/N, this icon will appear in the Inventory Transaction, General Tab and Inventory Transaction Detail, General Tab. For additional information refer to the Hazardous Materials Class/Division transaction code, via the Settings Training Manual.
icon will appear next to the Hazardous Material checkbox depending on the Class/Division transaction code selected in the Class/Division field to the right of the Hazardous Material checkbox. This transaction code can be set up via Settings/ Explorer/ System Transaction Code/ Hazardous Materials Class/Division. Once set up against a P/N, this icon will appear in the Inventory Transaction, General Tab and Inventory Transaction Detail, General Tab. For additional information refer to the Hazardous Materials Class/Division transaction code, via the Settings Training Manual.
Dangerous Goods ![]() icon
icon
The Dangerous Goods ![]() icon appears when the Hazardous Material checkbox is selected. Once set up against a P/N, this icon will appear in the Inventory Transaction, General Tab and Inventory Transaction Detail, General Tab.
icon appears when the Hazardous Material checkbox is selected. Once set up against a P/N, this icon will appear in the Inventory Transaction, General Tab and Inventory Transaction Detail, General Tab.
UN Number
The hazardous reference number. For more information, refer to the P/N Hazardous Materials System Transaction Code.
Packing Group
The specific Packing Group Code of the hazardous material. For more information, refer to the Hazardous Materials Packing Group System Transaction Code.
Class/Division
The Classification/Division Code of the hazardous material. For more information, refer to the Hazardous Materials Class/Division System Transaction Code.
Hazardous Material at Removal checkbox
This checkbox is available when the Hazardous Materials checkbox is selected. Select this checkbox to indicate that the part is considered Hazardous Material only after it is removed from an aircraft. If not selected, then the Hazmat part will be considered Hazardous Material regardless of it being installed or removed from an aircraft.
For example, if the part is available in inventory or currently installed on an aircraft but has never been removed from an aircraft, then the part will be in 'Cond Hazmat InActive' status which indicates that the part is not currently considered Hazardous Material.
If that same part is then installed and later removed from an aircraft, then the part will be in 'Cond Hazmat Active' status indicating that the part is currently considered Hazardous Material. The Hazardous Material At Removal checkbox will also be displayed in the Inventory Detail, Optional tab.
Once this Hazmat part is repaired, the Cond Hazmat Active checkbox must be deselected when receiving the R/O. Deselecting this checkbox resets the part as Cond Hazmat InActive.
When this checkbox is selected, the Web Link field to the right of the checkbox is activated for data entry. For more information refer to the Repair Order Receiving, General Tab via the Receiving Training Manual.
Note: When sending a hazmat part through Packing and Shipping, the 'Cond Hazmat Active' and 'Cond Hazmat InActive' statuses are overridden by the 'No Hazmat Allowed' checkbox from the Ship Via transaction code. This checkbox indicates that the freight forwarder cannot ship any part that has the Condition Hazmat checkbox selected in the P/N Master, Inventory tab. For more information, refer to Ship Via in the Packing Shipping Transaction Code Manual.
Web Link
The web address related to the hazardous materials, health & safety, or hazardous substance.
Health & Safety checkbox
Select this checkbox if the part is a Health & Safety part. When selected, this checkbox activates the Class field and a new Health and Safety Web Link field.
Health & Safety ![]() icon
icon
The Health & Safety ![]() icon appears when the Health & Safety checkbox is selected. This icon will appear throughout the system wherever the Dangerous Goods
icon appears when the Health & Safety checkbox is selected. This icon will appear throughout the system wherever the Dangerous Goods ![]() icon appears. Once set up against a P/N, this icon will appear in the Inventory Transaction, General Tab and Inventory Transaction Detail, General Tab.
icon appears. Once set up against a P/N, this icon will appear in the Inventory Transaction, General Tab and Inventory Transaction Detail, General Tab.
Class
The Class Code of the Health & Safety. This transaction code can be set up via Settings/ Explorer/ System Transaction Code/ Health & Safety Class.
Hazardous Information Cascade To Interchangeable ![]() button
button
Select this button to have the hazardous Materials information cascade down to any Interchangeable parts associated to the Main P/N.
Hazardous Substance checkbox
Select this checkbox if the part is classified as a hazardous substance. A hazardous substance is classified as a liquid or a gas. When this checkbox is selected, the Web Link field to the right of the checkbox is activated for data entry.
Hazardous Substance At Removal checkbox
This checkbox is activated when the Hazardous Substance checkbox is selected. Select this checkbox if there is hazardous substance at removal of the part.
Additional Information ![]() icon
icon
This icon represents any additional information the user would like to have shown in the Hazardous Information section of the P/N Master, Inventory tab. An icon will appear to the left of the Additional Information field if the user has selected an icon from the Additional Information Transaction Code. This transaction code can be set up via Settings/ Explorer/ System Transaction Code/ Additional Information.
Additional Information
The Additional Information Code for the hazardous information. This transaction code can be set up via Settings/ Explorer/ System Transaction Code/ Additional Information Transaction Code.
_____________________________________________________________________________________
Survey:
The following information/options are available in this window:
_____________________________________________________________________________________
Surveys
Select from one of the four options to create a survey for the action (i.e. scrapping a part, receiving a part etc.):
- PO/LO/EX RCV
- RO RCV
- R/I
- Scrap
The system displays the Survey Master Screen for each of these surveys:
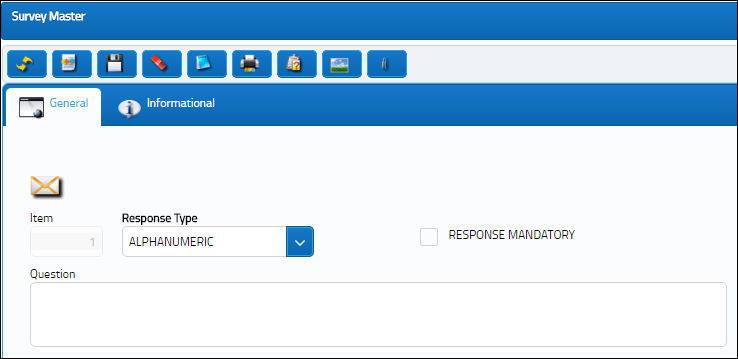
For information regarding the Survey functionality, refer to the Survey Button via the Task Card Buttons which can be found in the Engineering - T/C Training Manual.
_____________________________________________________________________________________
Automated Warehouse:
The following information/options are available in this window:
_____________________________________________________________________________________
Automated Warehouse Capable checkbox
Select this checkbox to indicate that this is an Automated Warehouse Capable part. When this checkbox is selected, the following fields become activated:
Store Exception - Enter the Store Exception Code to indicate where to stock the part in the Automated Warehouse. These codes are to prevent parts from being stored somewhere they should not be stored. (i.e. Flammable parts should not be stored near corrosive parts). These codes can be set up via Settings/ Explorer/ System Transaction Codes/ Settings/ Store Exception.
Store Exception SHC ID/ SHC 1/ SHC 2 - Enter the Store Exception Code to indicate where to stock the part in the Automated Warehouse. These codes can be set up via Settings/ Explorer/ System Transaction Codes/ Settings/ Store Exception SHC ID.
![]() These fields and checkbox are customized configurations and may not be available for your company. For additional information consult the appropriate Interface Administrator.
These fields and checkbox are customized configurations and may not be available for your company. For additional information consult the appropriate Interface Administrator.
_____________________________________________________________________________________
Share
Print
|
©1997-2024 Trax USA Corp. All rights reserved. This manual may not be copied, photocopied, reproduced, translated, or converted to any electronic or machine-readable form, in whole or in part, without prior written approval from Trax USA Corp. |
|