
 Share
Share
 Print
Print
|
|
|
|
|
Planning Info Button (ePlanning)
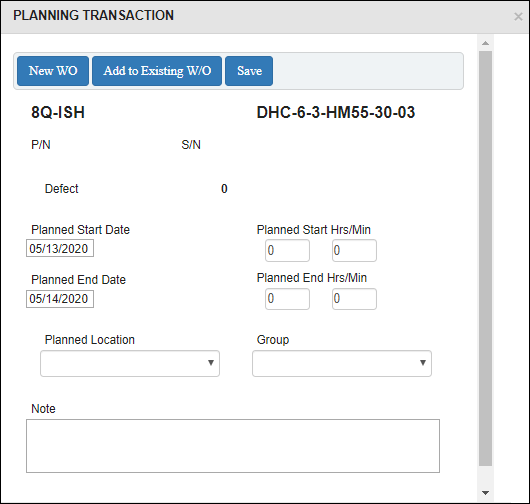
Select the Planning Info ![]() button to view the Planning Transaction Window. In this pop-up window, the Planned Start Date is defaulted from the Due Date or the date as defined by the Planning Lead Days on the record's Engineering Control, Schedule Tab. The user can override this Planned Date as required. Notice that the default Planned Start Date is the same as the Due Date in the screenshot below.
button to view the Planning Transaction Window. In this pop-up window, the Planned Start Date is defaulted from the Due Date or the date as defined by the Planning Lead Days on the record's Engineering Control, Schedule Tab. The user can override this Planned Date as required. Notice that the default Planned Start Date is the same as the Due Date in the screenshot below.

The user can override this Planned Date by selecting a new Planned Start Date/Planned End Date and selecting the Save button.
To add any notes select in the Note box and select the Save button. The Note is then added to the Planning Event.
The Planned Date, and any associated notes, will be cleared once the Work Order associated with the planned item is 'Closed' or manually complied with.
The following information/options are available in this window:
_____________________________________________________________________________________
New W/O button
Select the New W/O button to create a new Work Order. When selected, the new W/O window pops up. Enter all necessary information then click the Save ![]() button.
button.
Add to Existing W/O button
Users can add the selected tasks in the A/C's Task List window to an existing W/O by selecting the Add to Existing W/O button.
Save button
Select this button to save changes made in the Planning Transaction window.
A/C
The individual aircraft tail number.
E/C
The Engineering Control that specifies aircraft or component scheduled maintenance intervals.
P/N
The Part Number reference for the aircraft part.
P/N S/N
The Serial Number for the specific serialized part.
Defect
The defect number (or log book number).
Planned Start Date
This is used with the Work Order Planning Element. Enter the W/O Planned Start Date.
Planned End Date
This is used with the Work Order Planning Element. Enter the W/O Planned End Date.
Planned Start Hrs/Min
This is used with the Work Order Planning Element. Enter the W/O Planned Start Hrs/Min.
Planned End Hrs/Min
This is used with the Work Order Planning Element. Enter the W/O Planned End Hrs/Min.
Planned Location
The location in which the Work Order is going to take place.
Group
Select the shift group from the drop down menu to work on the planned item.
_____________________________________________________________________________________
The color of the Planning Date field will change based on the Planning Transaction Conditions via the Planning Transaction code manual.
![]()
Share
Print
|
©1997-2024 Trax USA Corp. All rights reserved. This manual may not be copied, photocopied, reproduced, translated, or converted to any electronic or machine-readable form, in whole or in part, without prior written approval from Trax USA Corp. |
|