
 Share
Share
 Print
Print
|
|
|
|
|
Engineering Authorization Explorer
The Engineering Authorization Explorer allows the user to review, reserve, accept, and/or reject Engineering Controls (E/Cs) that have been released for authorization. The authorization process can be as simple as a one step authorization, or a complex multi-step authorization process. The authorization configuration process is user-defined based upon each users' individual business process needs and can be set up via the E/C Category System Transaction Code.
Note: In order to use the Engineering Authorization Explorer, the ECAUTH configuration switch must be set to Yes. When set to Yes, an authorization will be required for all E/Cs initially created or revised. When set to No, authorization will not be required when creating new E/Cs. For more information, refer to Switch ![]() ECAUTH via the Engineering Switches Manual.
ECAUTH via the Engineering Switches Manual.
E/Cs will be visible in the Engineering Authorization Explorer window once they have been released for authorization via Engineering Authorization Management. If there are no E/Cs currently awaiting authorization, or there are no E/Cs pending authorization that fit the users' criteria based on the set-up of the E/C Category System Transaction Code, a No Records Found message will display.
![]() Note: In Version 4 and all later releases, this window contains search fields to narrow down the results of records pending authorization. For more information on the available search fields in the above window, refer to the Engineering Control Selection window via the Engineering Training Manual.
Note: In Version 4 and all later releases, this window contains search fields to narrow down the results of records pending authorization. For more information on the available search fields in the above window, refer to the Engineering Control Selection window via the Engineering Training Manual.
![]() Note: The E/C Analyzer
Note: The E/C Analyzer ![]() button provides a different look at the search results in the E/C Authorization windows. When selected, the same E/C search fields are available, but the results include various columns that will help the E/C authorization team quickly review important details. Instead of showing the regular E/C columns (Control Type, Category, Status, and Revision), it shows fields such as Schedule, Skills, Chap/Sec, etc. Then when an E/C record is selected, the standard E/C Authorization detail window opens. For more information refer to the E/C Analyzer Button, via Engineering Authorization Management.
button provides a different look at the search results in the E/C Authorization windows. When selected, the same E/C search fields are available, but the results include various columns that will help the E/C authorization team quickly review important details. Instead of showing the regular E/C columns (Control Type, Category, Status, and Revision), it shows fields such as Schedule, Skills, Chap/Sec, etc. Then when an E/C record is selected, the standard E/C Authorization detail window opens. For more information refer to the E/C Analyzer Button, via Engineering Authorization Management.
The Export as Excel ![]() button can be selected to view the queried data (including all pages) in an Excel spreadsheet. This Excel file can be saved for later use. For more information refer to the Export as Excel Button via the eMRO System Standards manual.
button can be selected to view the queried data (including all pages) in an Excel spreadsheet. This Excel file can be saved for later use. For more information refer to the Export as Excel Button via the eMRO System Standards manual.
The Filter/Sort ![]() button is used to alter the search criteria for records associated with the host module and window. For more information, refer to Filter/Sort Button via the eMRO System Standards Module.
button is used to alter the search criteria for records associated with the host module and window. For more information, refer to Filter/Sort Button via the eMRO System Standards Module.
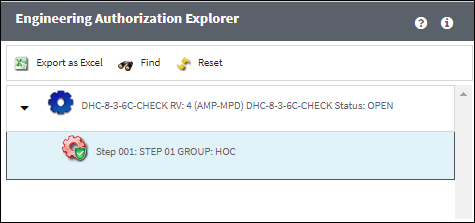
When entering the Engineering Authorization Explorer, the following window is displayed:
The following information/options are available in this window:
_____________________________________________________________________________________
E/C ![]() icon
icon
Identifies each E/C pending authorization; includes the E/C Number, pending Revision Number, E/C Category, E/C Description, and status of the Revision.
Accepted Status ![]() icon
icon
An Authorization Step that has been accepted. These steps can be viewed in Query Mode if required.
Current/Pending Step ![]() icon
icon
The current Authorization Step(s) pending acceptance. There may be more than one Authorization Step pending acceptance due to Parallel Steps being created in the configuration of the E/C Category System Transaction Code.
Note: The Parallel Step functionality allows for the grouping of a set of steps to be authorized in conjunction with one another during the Authorization Process. This is useful when several departments are required to authorize steps at the same time before the Authorization Process can continue on to the next step.
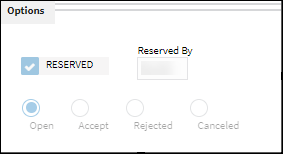
Reserved ![]() icon
icon
The reserved icon appears when a step has been reserved and the Reserved checkbox has been selected as shown below:
Upcoming Status ![]() icon
icon
An Authorization Step that is waiting for a prior step to be actioned. These steps cannot be actioned until the prior step(s) have been accepted, however, these steps can be viewed in Query Mode.
_____________________________________________________________________________________
Note: Authorization Steps can be configured in the E/C Category System Transaction Code to be accepted by a user that meets the required Department, Division and Section or Authorization Group criteria. This user defined configuration is based upon the business requirements of the customer. A user cannot Accept or Reject a step if they do not belong to the Department or Authorization Group that the step was set-up for; the user will be able to view the Authorization Step in Query Mode. For additional information regarding Authorization Groups, refer to Engineering Authorization Group Explorer.
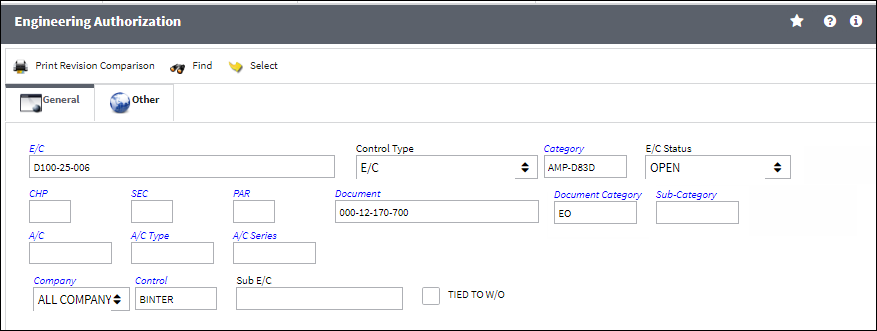
Before authorizing the E/C, the E/C details can be viewed in a query mode by selecting on the E/C and then selecting the Select ![]() button that appears.
button that appears.
To authorize each step, select on the step and the following prompt appears:
![]()
Select the Authorization pop-up and the Engineering Authorization window opens:
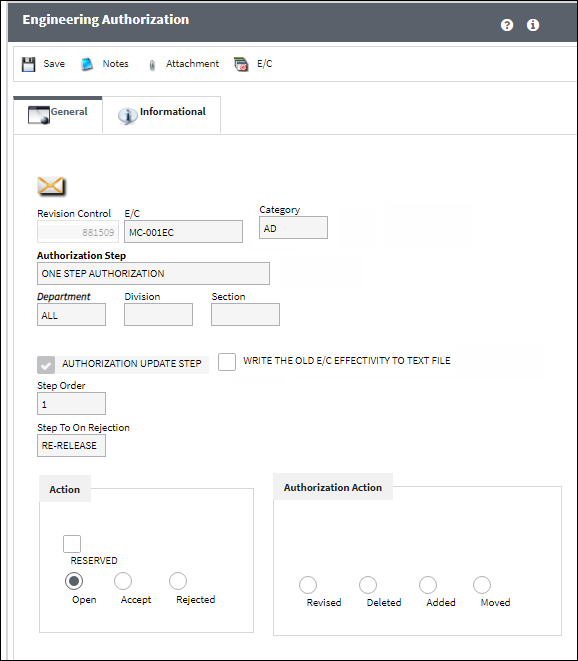
Note: The above screenshot has been modified to show the different fields that may be available in the window. Depending on your scenario not all fields may appear.
The following information/options are available in this window:
_____________________________________________________________________________________
Revision Control
Automatically generated control number for each revision step.
E/C
The Engineering Control that specifies aircraft or component scheduled maintenance intervals.
Category
The category of the E/C (e.g., AD, SB, CHECK).
Authorization Step
A description of the Authorization Step; each Authorization Step can have its own unique description to describe the steps general purpose.
Department
The department which has authority for approval of this step. The Authorization Step can only be performed by an individual in the department specified here. See Settings/ Update/ Employee Master to verify that the employee is assigned to the appropriate department. Authorizing employees must have security access to the appropriate Authorization Explorer option. When this field is left blank, the Authorization Group field is available.
Division
The division which has authority for approval of this step. The Authorization Step can only be performed by an individual in the division specified here.
Section
The section which has authority for approval of this step. The Authorization Step can only be performed by an individual in the section specified here.
Authorization Group
The Authorization Group which has authority for approval of the step. The Authorization Step can only be performed by an individual that is included in the Authorization Group specified here.
Authorize Update Step checkbox
When selected, the checkbox indicates that the current Authorization Step will be the last step in the authorization process. During the creation of the Authorization Steps, this checkbox should only be selected for the final step before the record is to be released from authorization.
Note: The Authorization Update Step checkbox can only be assigned to one Authorization Step and should be selected for the last step in the authorization process. Once that Authorization Step has been accepted, the E/C will be released and the new revision will be used in the system.
Write the old E/C effective to text file checkbox
Select this checkbox to have the system save the E/C effectivity information to a text file upon completion of this task. The user will be informed of the location upon selecting the Save ![]() button.
button.
Step Order
This number indicates the order of Steps if one or multiple Steps are created. This number is automatically created and can be overridden and changed to any number. It is recommended that the user enter Steps in a standard incremental pattern (i.e. Step 5, Step 10, Step 15, etc.) to allow for the insertion of Steps into the sequence at a later time if required.
Step To On Rejection
This indicates how the Authorization Process will react when a Step is rejected (Start, Return To, Re-Release). When an authorization step has been rejected, the Step To On Rejection process begins based on the configuration of the E/C Category System Transaction Code.
Start - Will return the Authorization Process to the first step.
Return To - Will return the Authorization Process to a specific Authorization Step as specified by the 'Return To' Step number in the Return To Step Order field.
Re-Release - Will return the Authorization Process to the queue where it will await Release For Authorization.
Reserved checkbox
This allows a user to reserve the step. This will lock that user into that specific authorization step and does not allow another user to accept the step. The name of the user who Reserved the Authorization Step will appear in the Reserved By field.
Open radio button
All authorization steps are initially in Open status, until either Accepted or Rejected. A step can also be Open and Reserved at the same time.
Accept radio button
This option is selected when the user accepts the authorization step.
Rejected radio button
This option is selected when the user is rejecting the Authorization Step when there are reasons that do not permit the step from remaining open or being accepted. The Rejection Reason field is mandatory upon the Authorization Step becoming Rejected.
Rejection Reason - A Rejected Reason must be entered when Rejecting an Authorization Step. An authorization Step can be Rejected and Reserved at the same time so that when the authorization process comes back to that specific step, the same person who rejected it will have to authorize that same previously. This is especially beneficial due to the original person who rejected the step knowing first hand why it was rejected.
Authorization Action
Select any of the below authorization actions. These actions will be recorded in the Revision History tab of Engineering Control. For additional information refer to Engineering Control, Revision History Tab via Engineering Control of the Engineering - E/C Training Manual.
Revised radio button - This is informational only.
Deleted radio button - This is informational only.
Added radio button - This is informational only.
Moved radio button - This is informational only.
_____________________________________________________________________________________
To accept the Engineering Authorization Step, select the Accept radio button and then select the Save ![]() button. After accepting an Authorization Step, either the EC will be Authorized or the next Authorization Step will move to a pending status for the next step to be actioned.
button. After accepting an Authorization Step, either the EC will be Authorized or the next Authorization Step will move to a pending status for the next step to be actioned.
To reject the Engineering Authorization step, select the Rejected radio button and then select the Save ![]() button. When rejecting an Authorization Step, the Rejection Reason field appears in the window. It is mandatory to populate the reason when rejecting an Authorization Step.
button. When rejecting an Authorization Step, the Rejection Reason field appears in the window. It is mandatory to populate the reason when rejecting an Authorization Step.
To reserve the Engineering Authorization step, select the Reserve checkbox and then select the Save ![]() button. When reserving an Authorization Step, this will prevent other users from accessing that Authorization Step and the authorization process cannot be completed until you Accept or Reject this Authorization Step.
button. When reserving an Authorization Step, this will prevent other users from accessing that Authorization Step and the authorization process cannot be completed until you Accept or Reject this Authorization Step.
After saving your selection the system automatically returns to the Engineering Authorization Explorer window; you will need to collapse and re-open the EC to view the changes. The revision is created and replaces the previously existing revision, or creates the initial revision if it is a new E/C.
Note: Engineering Authorization Explorer Supervisor has the ability to alter the configuration for the E/C Authorization for this specific revision, it will not make any changes to the actual E/C Category System Transaction Code configuration Authorization Steps.
Note: The Parent Step Order field in the E/C Category System Transaction Code allows for the creation of a Parent/Child relationship between steps in the Authorization Process, which may be useful if two individuals from the same department need to authorize a particular step. The Parent Step Order is only available if using a Department/Division/Section as the authorization process; Parent Step Order cannot be used with Authorization Groups.
If required, a text file can be created with the old E/C Effectivity by selecting the 'Write the old E/C Effectivity to text file' checkbox. This is an optional selection and can only be selected on the Authorization Update Step. The generated file is saved and will be located in the default eMRO directory folder.
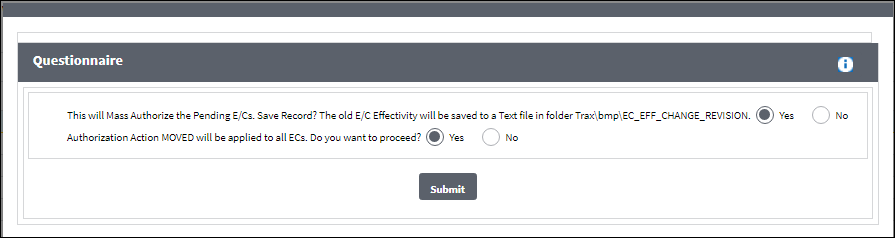
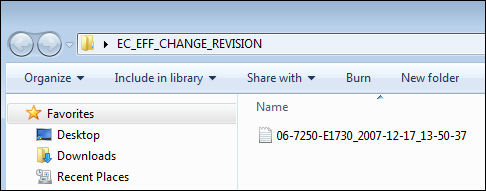
Note: If Switch ![]() SAVEASEC is set to Yes, the user will be able to select the save location of the Old E/C Effectivity text file (Mass Authorization Pending E/C and Engineering Authorization Windows). However, if the switch is set to NO, the file is automatically saved in the Directory: TRAX\bmp\EC_EFF_CHANGE_REVISION folder.
SAVEASEC is set to Yes, the user will be able to select the save location of the Old E/C Effectivity text file (Mass Authorization Pending E/C and Engineering Authorization Windows). However, if the switch is set to NO, the file is automatically saved in the Directory: TRAX\bmp\EC_EFF_CHANGE_REVISION folder.
Share
Print
|
©1997-2024 Trax USA Corp. All rights reserved. This manual may not be copied, photocopied, reproduced, translated, or converted to any electronic or machine-readable form, in whole or in part, without prior written approval from Trax USA Corp. |
|