
 Share
Share
 Print
Print
|
|
|
|
|
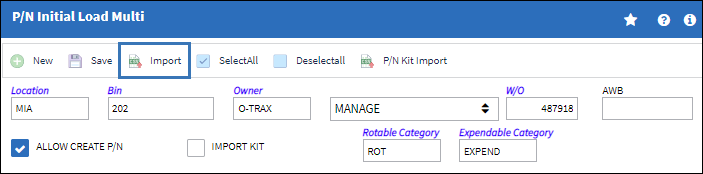
Import Button, via P/N Initial Load Multi
The Import ![]() button is used to import parts into the system that will be managed for a customer or vendor.
button is used to import parts into the system that will be managed for a customer or vendor.
There are two types of imports that can be performed using this button:
- Import maintenance parts into the system. With this option, once the file is imported the user will review and edit the part details in the P/N Initial Multi Load window before saving and committing the parts to inventory.
 Import kit assembly parts into the system. With this option, the Import Kit checkbox must be selected and the kit assembly hierarchical structure (N/H/K and N/L/K) must be set up via the P/N Master, Kit Button. When this import is performed, the parts are automatically loaded into the system (not loaded into the P/N Initial Multi Load window).
 Note: The
 P/N Kit Import
  button is available in the P/N Initial Load Multi window to build kit assembly's hierarchical structure in the P/N Master.
With both options, the P/N Initial Multi Load window allows the user to import a file that lists all the parts that are owned by a customer or vendor.
First, the user must prepare the file. For information how to prepare the import file, refer to Preparing File For Import, via the Import Button of the System Standards Training Manual.
Note: Import files for eMRO should be saved as .csv (comma delimited) or .xlsx and cannot have spaces in the title of the file. Spaces in the file path will cause errors when importing.
Criteria for Owned P/Ns file:
Column Name |
Data Type |
Limitation |
Path |
P/N |
Alphanumeric |
35 |
Inventory/ Update/ Inventory Transaction/ Inventory Detail |
S/N |
Alphanumeric |
35 |
Inventory/ Update/ Inventory Transaction/ Inventory Detail |
Description |
Alphanumeric |
300 |
Inventory/ Update/ Inventory Transaction/ Inventory Detail |
Qty |
Numeric |
8 |
Inventory/ Update/ Inventory Transaction/ Inventory Detail |
Condition |
Alphanumeric |
8 |
Inventory/ Update/ Inventory Transaction/ Inventory Detail |
Shelf Life |
Numeric |
8 |
Inventory/ Update/ Inventory Transaction/ Inventory Detail |
Stock UOM |
Alphanumeric |
8 |
Inventory/ Update/ Inventory Transaction/ Inventory Detail |
P/N Software |
Alphanumeric |
60 |
Inventory/ Update/ Inventory Transaction/ Inventory Detail |
AWB |
Alphanumeric |
30 |
Inventory/ Update/ Inventory Transaction/ Inventory Detail |
Approved Certificate |
Alphanumeric |
30 |
Inventory/ Update/ Inventory Transaction/ Inventory Detail |
Vendor Lot |
Alphanumeric |
20 |
Inventory/ Update/ Inventory Transaction/ Inventory Detail |
|
Alphanumeric |
35 |
Inventory/ Update/ Inventory Transaction/ Inventory Detail |
|
Alphanumeric |
35 |
Inventory/ Update/ Inventory Transaction/ Inventory Detail |
|
Alphanumeric |
10 |
Inventory/ Update/ Inventory Transaction/ Inventory Detail |
Import maintenance parts into the system
Populate the P/N Initial Load Multi window header and select the Import ![]() button.
button.
Complete all the import steps. For information how to import a file, refer to Importing a File via Import Button of the System Standards Training Manual.
The P/N Initial Load Multi window displays a row for each part that was imported from the excel file. The part details should be reviewed and edited if required.
Note: There is no limit to the number of parts that may be imported. It is best practice to enter as much information about the part for the benefit of later use of the part.

Note: While editing data, the user may select the Save ![]() button to save details as they work, however, for the system to retain the row details the Select checkbox must be selected for that row; if the Select checkbox is not selected before the Save
button to save details as they work, however, for the system to retain the row details the Select checkbox must be selected for that row; if the Select checkbox is not selected before the Save ![]() button is selected, that row will be removed from the window.
button is selected, that row will be removed from the window.
Select the Save ![]() button and a pop up will appear asking if the user wants to close and update the template.
button and a pop up will appear asking if the user wants to close and update the template.
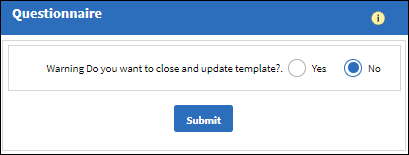
- If No is selected, the data entered in the window will be retained and the user can continue making entries. If the Select checkbox is not selected for a row, that row will be removed from the window.
- If Yes is selected, the data entered in the window will be loaded into inventory. If the Select checkbox is not selected for a row, that row will not be loaded into inventory.
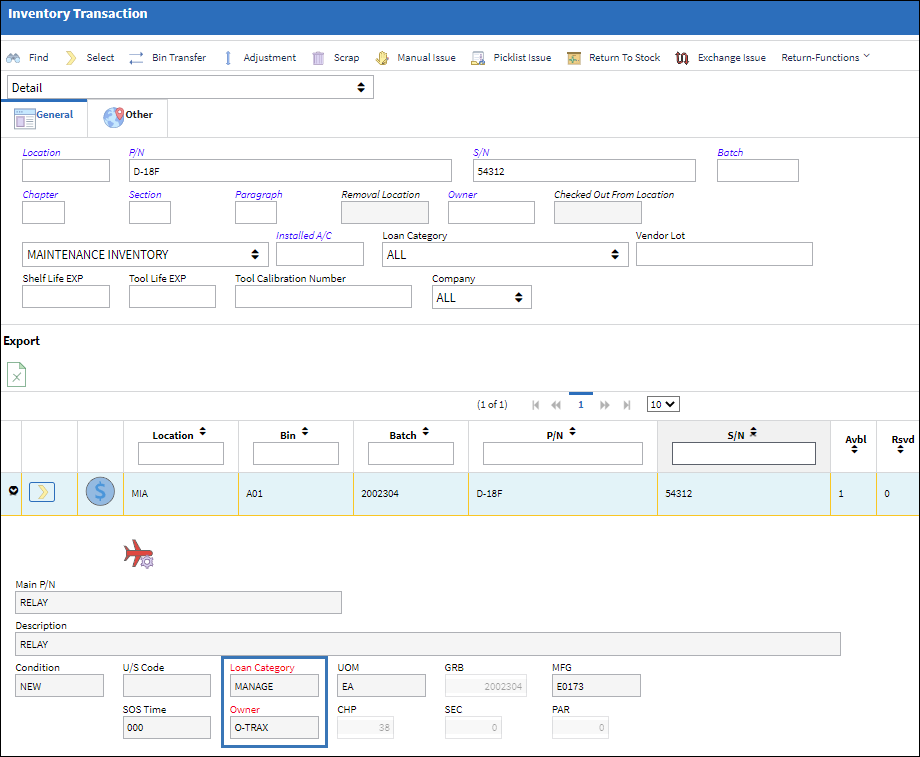
To confirm the part has been loaded to inventory, go to Inventory/ Update/ Inventory Transaction, enter the P/N S/N and select the Find ![]() button. The system will display the part and identify it as a Managed part.
button. The system will display the part and identify it as a Managed part.
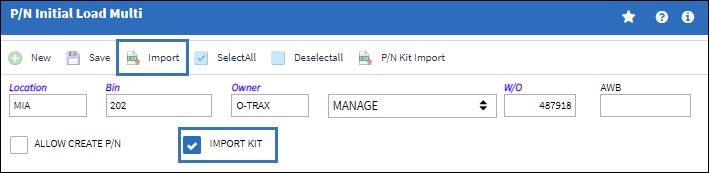
![]() Import kit assembly parts into the system
Import kit assembly parts into the system
Populate the P/N Initial Load Multi window header and select the Import ![]() button.
button.
Note: Ensure the Import Kit checkbox is selected.
Note: Before importing all kits, ensure that all controls are set up in the P/N Master (Shelf Life, Tool Life, P/N Controls, etc.).
Complete all the import steps. For information regarding how to import a file, refer to Importing a File, via Import Button of the System Standards Training Manual.
The Import From File window appears with the parts imported from the file.
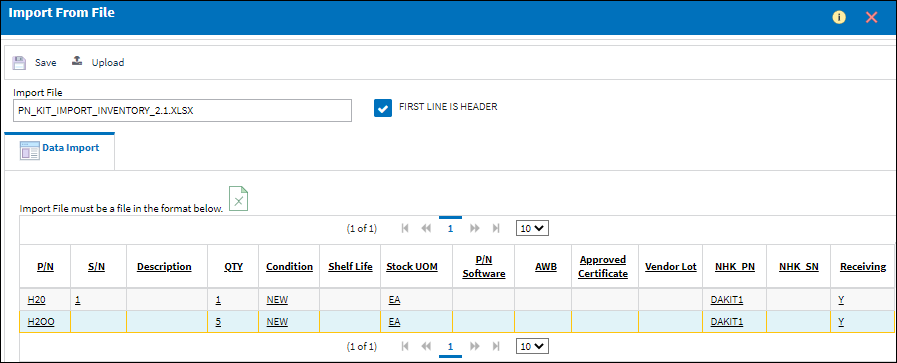
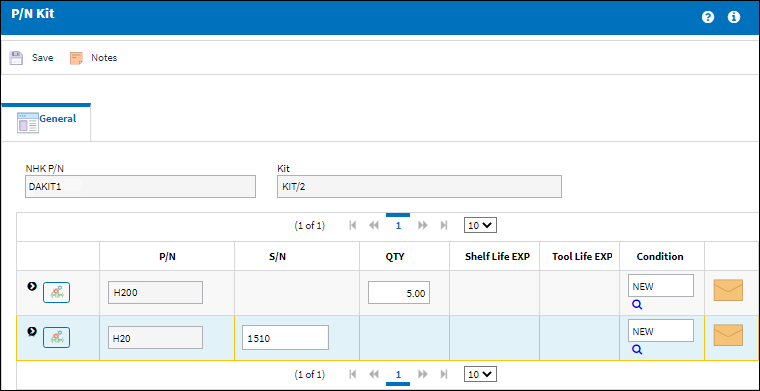
The P/N Kit window appears and allows the user to edit the S/N, Quantity, and Condition of the part.
Once saved, if any P/N's have P/N Controls then a P/N Inventory Control pop up will appears to make any adjustments to the control's details.
Possible Warning/Errors when importing consumable P/Ns for kits:
_____________________________________________________________________________________
- If the import file is incomplete and missing a line item (N/L/K P/N), the import will proceed and a warning appears "KIT The Kit 'NHKKITPN' is not complete, P/N: 'NLKKINPN' is missing."
- If the Receiving column is set to 'Y' and the Qty column is greater than the actual quantity of the N/L/K set up under the N/H/K, a warning appears "QTY the QTY '10.0' is incorrect for P/N: 'NLKKITPN', and this Kit 'NHKKITPN' could not be processed." The parts will not be added to inventory.
- If the Receiving column is set to 'Y' and the Qty column is less than the actual quantity of the N/L/K set up under the N/H/K, an N/L/K batch will be created for the specified quantity and put in inventory, and an N/L/K batch will be created for the missing quantity and will be Pending R/I.
- If the Receiving column is set to 'Y' or 'N' and the Qty column is greater or less than the actual quantity of the N/L/K set up under the N/H/K, a warning appears "QTY the QTY '3.0' is not complete for P/N: 'NLKKITPN', and this Kit 'NHKKITPN' could not be processed." The parts will not be added to inventory.
- If the Receiving column is set to 'N' and the Qty column equals the quantity of the N/L/K set up under the N/H/K, the kit will be added to inventory and the N/L/K parts will be Pending R/I.
_____________________________________________________________________________________
Once all the details have been entered and saved, the N/H/K and N/L/K P/N's will be available in inventory.
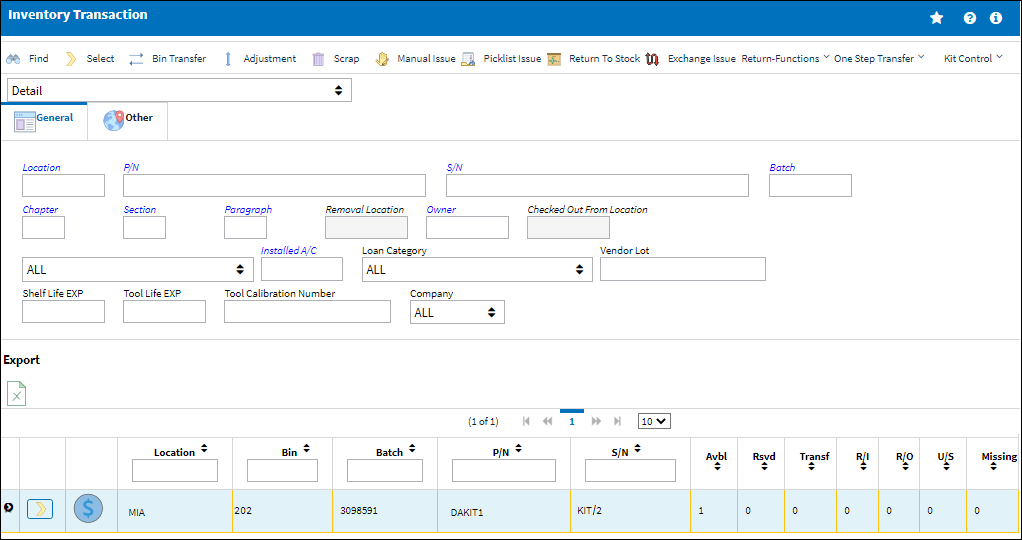
Note: If any of the P/N's had the Receiving column set to 'N', these P/N's will appear in inventory but will be Pending R/I.
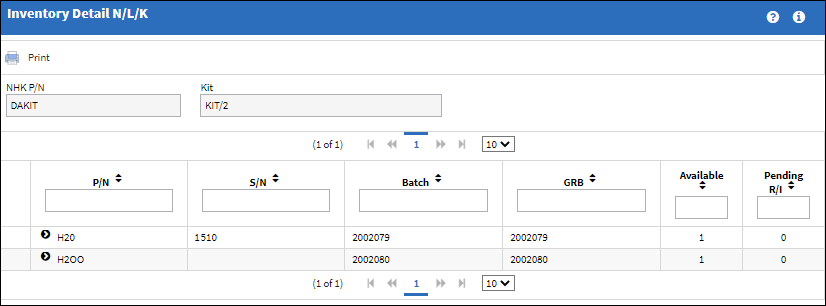
Select into the kit details and select the N/L/K ![]() button to view the parts that make up the kit assembly.
button to view the parts that make up the kit assembly.
Share
Print
|
©1997-2024 Trax USA Corp. All rights reserved. This manual may not be copied, photocopied, reproduced, translated, or converted to any electronic or machine-readable form, in whole or in part, without prior written approval from Trax USA Corp. |
|