
 Share
Share
 Print
Print
|
|
|
|
|
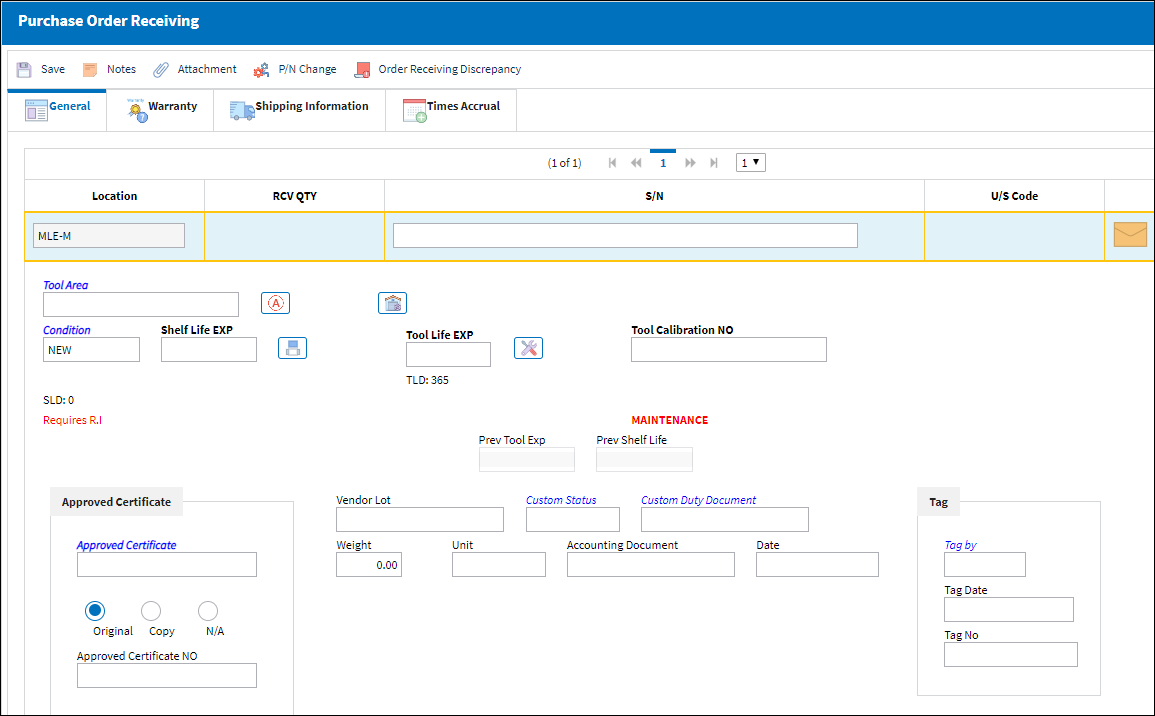
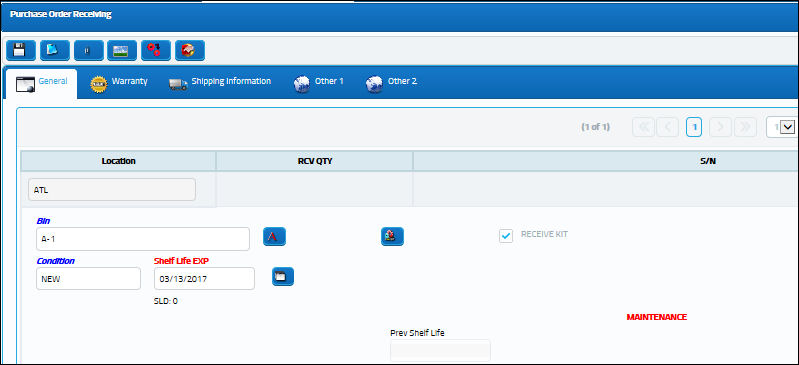
The Order Receiving Detail, General tab is used to enter the component bin location, serial number, and bin information.
Note: The above example of the Order Receiving Detail is that of a Purchase Order. However, all order types contain the same fields and tabs when being received, with the exception of Repair Orders. For details on the receiving of a R/O, refer to Repair Order Receiving.
![]() Note: The fields in the Other 1 tab and Other 2 tab via the Order Receiving Detail have been migrated to the Order Receiving Detail, General tab. The Other 1 tab and Other 2 tab in the Order Receiving Detail are no longer available in eMRO version 5.
Note: The fields in the Other 1 tab and Other 2 tab via the Order Receiving Detail have been migrated to the Order Receiving Detail, General tab. The Other 1 tab and Other 2 tab in the Order Receiving Detail are no longer available in eMRO version 5.
The following information/options are available in this window:
_____________________________________________________________________________________
Location
The Location for maintenance events, inventory stores, orders, transactions, or training events.
Bin
The specific storage bin within the inventory location.
 GREYOUTBINPREF: When set to Yes and the P/N has been set up with preferred bin locations, then the Bin field will be automatically greyed out from the following windows:P/N Initial Load, Bin Transfer, Order Receiving, Return To Stock. When set to No, the Bin field will be available regardless of prior preferred bin locations set up for the P/N.
Note: From the Bin Drop Down Selection, the Empty Bin
 button is available.
Tool Area
The location/area of the tool. This is similar to a bin for tools. This field appears when the part being received is a tool.
Auto Populate Bin ![]() button
button
Select this button to auto populate the bin for this part. The bin must be set up against the part in the P/N Master. For additional information, refer to the Bin Category field, via the P/N Master, Optional Tab of the Settings Training Manual.
Note: If the dimensions of the part (set up via the P/N Master, Optional Tab) exceed the size of the bin, the user will receive the following error:
![]()
S/N
The Serial Number for the specific serialized part.
Condition
The condition of the part.
P/N
The Part Number reference for the aircraft part.
Requires R.I.
If a component requires secondary inspection, the Requires R.I. flag will appear. By checking the R/I flag box via the Part Number Master/Technical Engineering Tab, receiving inspection of the component will be required before it is received into inventory or issued.
General
If the component being received is a general inventory type, the General flag will appear.
GSE
If the component being received is a GSE inventory type, the GSE flag will appear.
Maintenance
If the component being received is a maintenance inventory type, the Maintenance flag will appear.
Non-Inventory
If the order was for a non-inventory part (a part not set-up in the P/N Master or P/N Master General Inventory), the Non-Inventory Flag will appear.
Shelf Life EXP
The shelf life expiration date of the part, as applicable.
Note: When receiving a One Way Forward interchangeable P/N that does not have the Shelf Life Flag selected in its P/N Master, Inventory tab instead of the Main P/N that does have a Shelf Life Flag selected, the Shelf Life EXP date will not be available.
Tool Life EXP
The tool life expiration date of the part, as applicable.
Note: When receiving a One Way Forward interchangeable P/N that does not have the Tool Control and Tool Calibration Flag selected in its P/N Master, Inventory tab instead of the Main P/N that does have a Tool Control and Tool Calibration Flag selected, the Tool Life EXP date will not be available.
Tool Calibration Number
This is a unique number used to define a tool. This field only appears if the Tool Calibration Number Required checkbox is selected via the P/N Master, Inventory tab, via the P/N Master of the Settings Training Manual.
- DRONIP - (Deny Receiving Of Non-Inventory Parts) - If set to No, non-inventory parts can be received. If set to Yes, a message will appear that stops the user from completing the receipt.
![]()
- RCVAOGMS - (Receiving AOG Notification Message) - If set to Yes, when receiving a P/N that has an AOG requisition, an alert appears indicating that an AOG requisition exists for the P/N.
![]()
- PORCVAU - (Allows Only Authorized Orders to Be Received) - If set to Yes, orders that have not been previously authorized cannot be received. If authorization is required and the Order being received has not been authorized, the following prompt will appear:
![]()
- DNTALWBOG - (Do not allow bogus parts to be received) - If set to Yes, the system will not allow a bogus part to be received with a hard warning. If set to No, the system will allow a bogus part to be received with only a soft warning. Nevertheless, the serial number can be received after confirming the message with the option to select Yes. For more information, please refer to the Training Manual Inventory, Chapter Inventory Bogus P/N.
Approved Certificate ![]()
The type of certificate approving the part (ie. Form 1, EASA etc.). The user may choose from a pre-defined transaction code, or enter the Approval Certificate manually.
- APCERTVAL - (Approved Certification validation at Order Receiving). If set to Yes, the system will not validate an Approved Certificate in the Order Receiving window that is not registered in the System Transaction Codes. If set to No, the system will validate an Approved Certificate in the Order Receiving window that is not registered in the System Transaction Codes.
Original radio button - Select this radio button to indicate that the certificate is an original.
Copy radio button - Select this radio button to indicate that the certificate is a copy.
Approved Certificate Copy - The type of certificate copy.
Note: Depending on the setting of the Switch ![]() RIAPCRMN, this field will or will not be mandatory.
RIAPCRMN, this field will or will not be mandatory.
N/A radio button - Select this radio button to indicate that the certificate is not available.
Approved Certificate Number ![]()
The Approved Certificate Number. This is a free text field.
![]() Note: This field can hold up to 30 characters.
Note: This field can hold up to 30 characters.
Vendor Lot ![]()
Vendor batch number of the part entered upon receiving or initial load, as applicable. This field can contain up to 20 characters.
Note: If the received component is lot controlled, the lot number must be entered before receiving.
Custom Status ![]()
Customs status that applies to the part in the transaction, as applicable.
Custom Duty Document ![]()
Document used to verify that the part was accepted by customs.
![]() Note: This field supports up to 20 characters.
Note: This field supports up to 20 characters.
Weight ![]()
The weight of the component being received. This information is being pulled from the Optional Tab of the P/N Master.
Unit ![]()
The unit of weight for the component being received. This information is being pulled from the Optional Tab of the P/N Master.
Tag By ![]()
The vendors who issued the tag for the component.
Tag Date ![]()
Date of the Tag.
Tag Number ![]()
The tag number associated with the part.
_____________________________________________________________________________________
Additional Functionality 1:
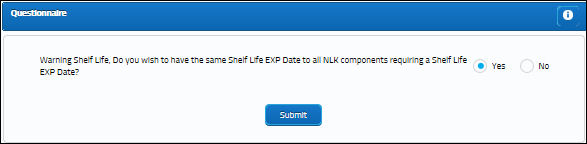
The Shelf Life Date will now cascade down to any NLK part numbers that require the entry of a Shelf Life Date.
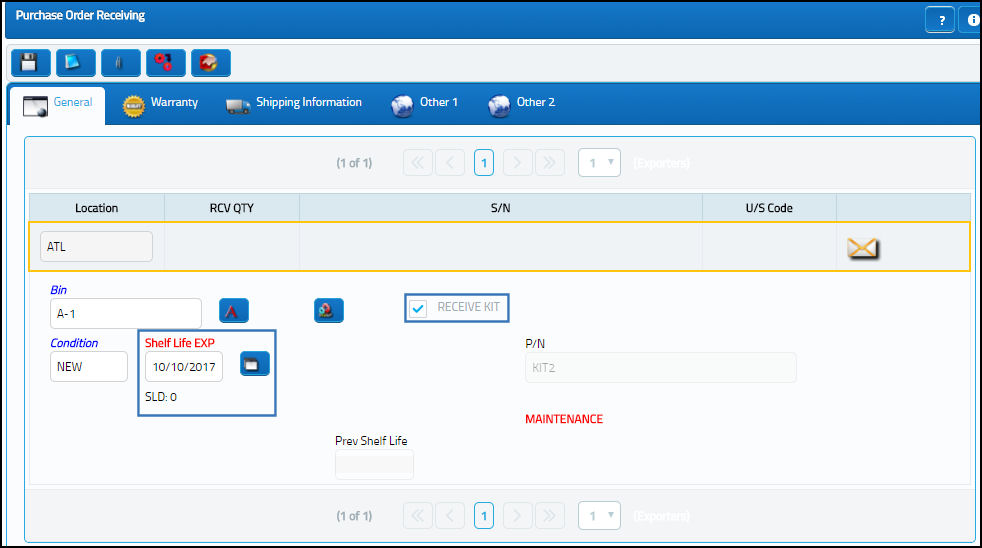
When receiving a PO for a Kit, populate the Shelf Life EXP field and be sure to select the Receive Kit checkbox. Select the Save ![]() button. The Save prompt will appear. Select 'OK.'
button. The Save prompt will appear. Select 'OK.'
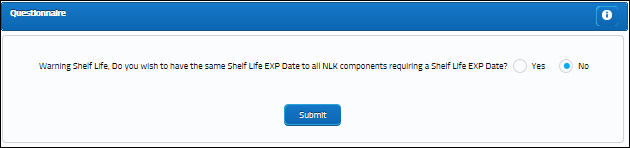
The system displays the following prompt. Select 'Yes.'
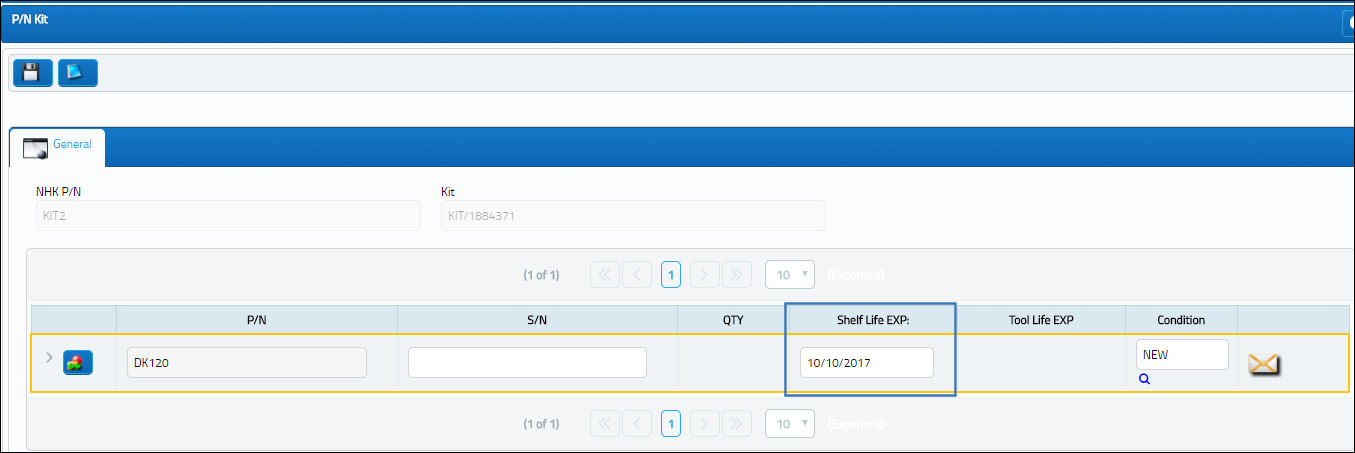
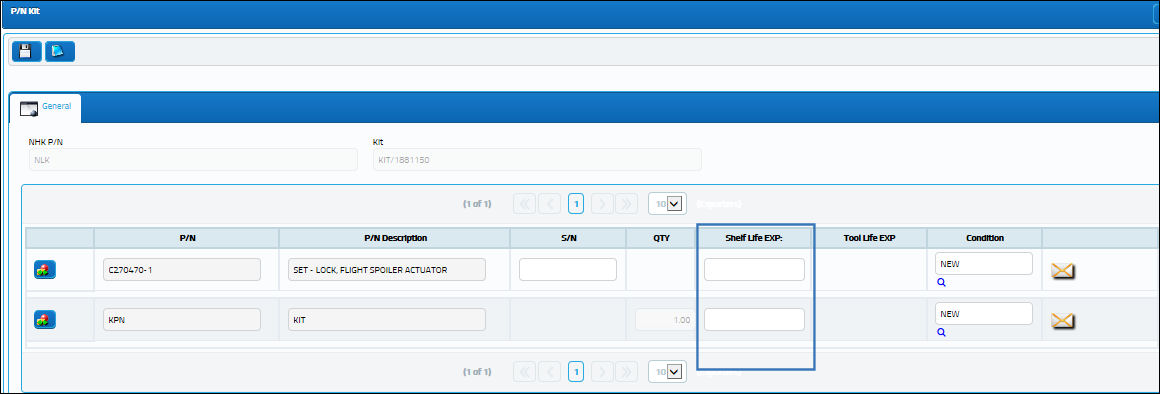
The P/N Kit window appears. The Shelf Life EXP dates for the NLK parts have been auto populated with the date from the Kit:
The user completes another PO Receiving transaction for the Kit. Populate the Shelf Life and be sure the select the Receive Kit checkbox. Once the Save prompt appears, select 'OK.'
The system displays the following prompt. This time however, select 'No.'
The P/N Kit window appears. The Shelf Life EXP dates for the NLK parts are not populated, but still mandatory:
Additional Functionality 2:
When a Part Number Serial Number is received that is the same as a former P/N S/N that was Exchange Issued, a soft warning appears informing the user of this redundancy. Because it is a soft warning, users can still save the transaction after selecting OK in the prompt.
Note: For more information regarding Exchange Issues, refer to the Exchange Issue Button via the Inventory Training Manual.
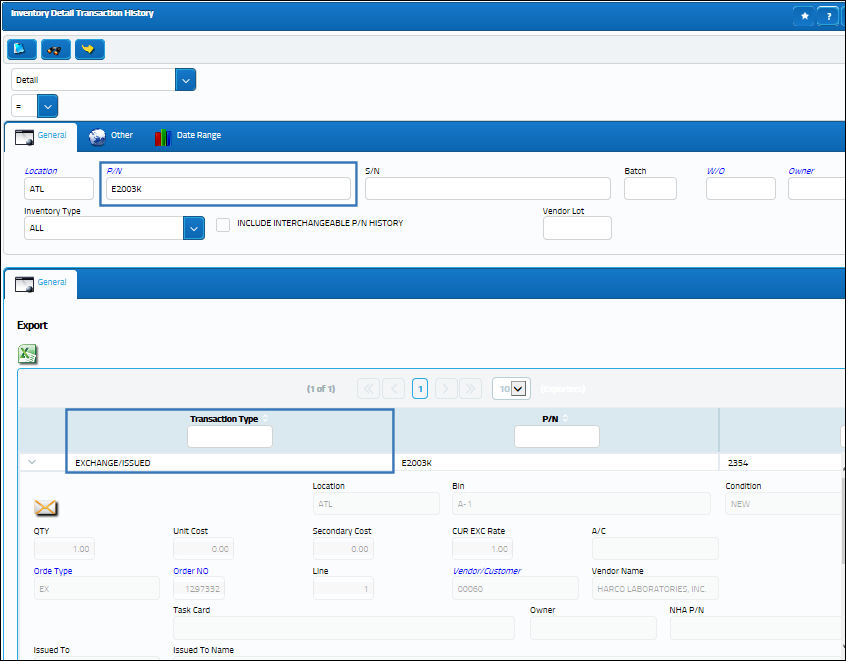
For example, from the Inventory Detail Transaction History, notice the P/N S/N for a historic 'EXCHANGE/ISSUE' Transaction Type.
A Purchase Order was created for the part. Then, from the Purchase Order Receiving window, the same Serial Number for the Exchange Issue above is entered into the S/N field. When the Save ![]() button is selected, the following prompt appears.
button is selected, the following prompt appears.
Note: A System Notification can be set up in conjunction with this functionality. Anytime the above soft warning is triggered, an email, note or text message explaining this can be sent to the user. For more information on the setting up of these notes, refer to the System Notification via the Settings Training Manual.

Once OK is selected, users can proceed with the save or they can cancel it and change the S/N.
Share
Print
|
©1997-2024 Trax USA Corp. All rights reserved. This manual may not be copied, photocopied, reproduced, translated, or converted to any electronic or machine-readable form, in whole or in part, without prior written approval from Trax USA Corp. |
|