
 Share
Share
 Print
Print
|
|
|
|
|
The Range ![]() button allows users to specify the P/N E/C effectivity status for ranges of Serial Numbers. All other S/Ns that don't fall in within the specified S/N ranges (if any) will be set to a default status. The S/N ranges and statuses set up through this button will come into effect for the various S/Ns as those S/Ns are initially loaded into the system (via P/Os, L/Os, P/N Initial Loads, etc.).
button allows users to specify the P/N E/C effectivity status for ranges of Serial Numbers. All other S/Ns that don't fall in within the specified S/N ranges (if any) will be set to a default status. The S/N ranges and statuses set up through this button will come into effect for the various S/Ns as those S/Ns are initially loaded into the system (via P/Os, L/Os, P/N Initial Loads, etc.).
Having selected into the Engineering Control Range, select the New ![]() button to create a serial number range with applicable status and reason information for in range and out of range serial numbers.
button to create a serial number range with applicable status and reason information for in range and out of range serial numbers.
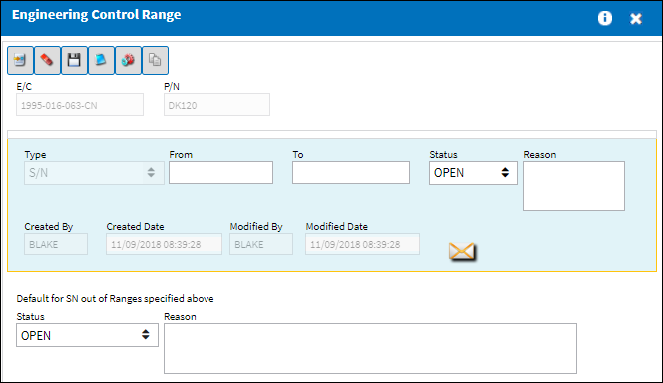
The following information/options are available in this window:
_____________________________________________________________________________________
Type
Serial Number. This field is hard coded and may not be changed.
From - To Range
Enter the From - To range for effectivity to be applied.
Status
Enter the appropriate status for the specified part serial number.
Note: This field is not visible when Switch ![]() ADDSTENGRANGE is set to No.
ADDSTENGRANGE is set to No.
Source
The way that the range was imported/created. This field is updated automatically. The available options are E/C, IPC, and MAN (Manual). The Source is 'MAN' when any part of the range was entered or altered manually.
Note: This field is not available when Switch ![]() ADDSTENGRANGE is set to Yes.
ADDSTENGRANGE is set to Yes.
Reason
Enter the reason for the change to the range of Serial Numbers.
Note: This field is not visible when Switch ![]() ADDSTENGRANGE is set to No.
ADDSTENGRANGE is set to No.
Created By
The user who created the record.
Created Date
The date the record was created.
Modified By
The user who last modified the record.
Modified Date
The date the record was last modified.
Default SN Status and Range
Enter the default Status and Reason for all serial numbers that are out of the specified range.
_____________________________________________________________________________________
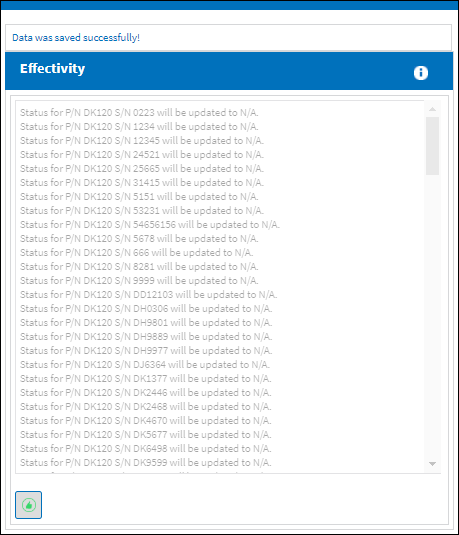
Populate the From-To range, Status, and Reason fields and select the Save ![]() button.
button.
An Effectivity popup window will appear displaying the serial number status updates for the ranges specified.
Select the Yes ![]() button to continue.
button to continue.
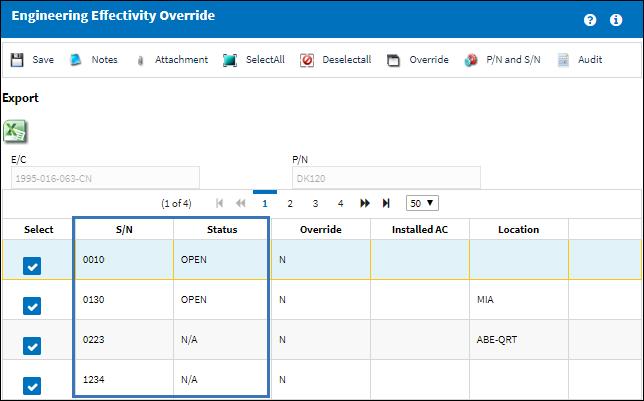
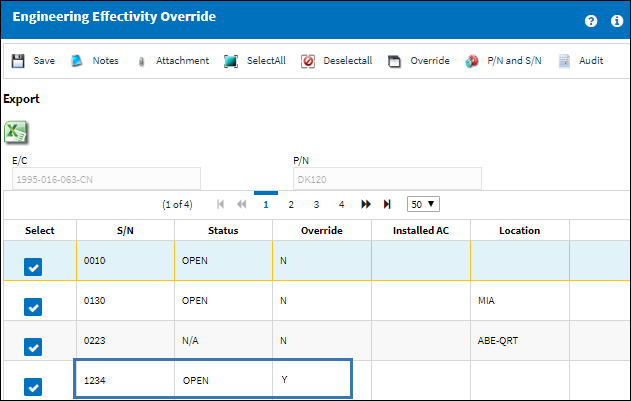
Exit the Engineering Control Range window and select the Override ![]() button. The Engineering Effectivity Override window appears; the status for each S/N has been updated based on the range set up in the Engineering Control Range window.
button. The Engineering Effectivity Override window appears; the status for each S/N has been updated based on the range set up in the Engineering Control Range window.
Status/Reason Functionality:
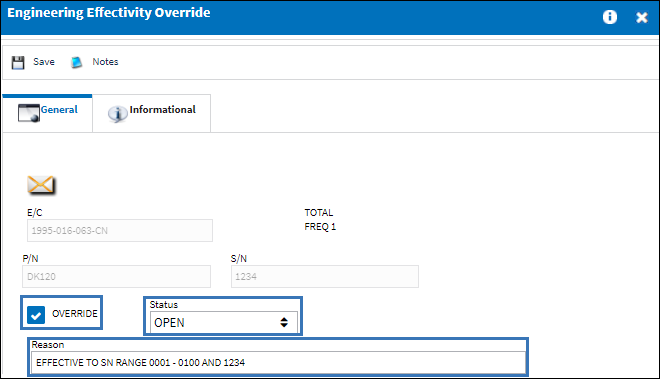
Once the user selects into the part, the Engineering Effectivity Override window will display the selected P/N S/N information including the Status and Reason information.
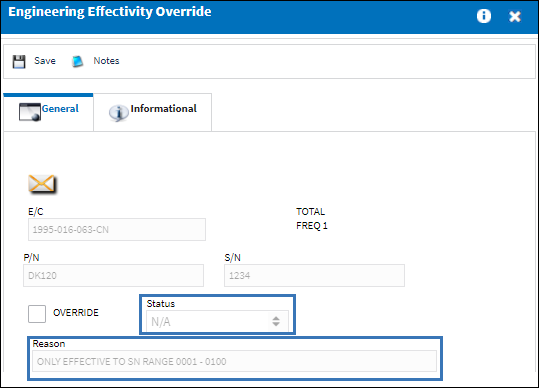
To modify the Status and Reason fields, select the Override checkbox, make the applicable changes, and select the Save ![]() button.
button.
In the Engineering Effectivity Override window, the new status is displayed and the Override field now displays Y.
Share
Print
|
©1997-2024 Trax USA Corp. All rights reserved. This manual may not be copied, photocopied, reproduced, translated, or converted to any electronic or machine-readable form, in whole or in part, without prior written approval from Trax USA Corp. |
|