
 Share
Share
 Print
Print
|
|
|
|
|
All modifications to a user's profile must be done through the Security window of the Security Explorer. If creating a new user select the New User ![]() button. To update an existing user select the Update User
button. To update an existing user select the Update User ![]() button. Both options will open the Security window. Refer to the New User / Update User Buttons for more information on accessing the Security window.
button. Both options will open the Security window. Refer to the New User / Update User Buttons for more information on accessing the Security window.
The following fields are available from the Security, General tab.
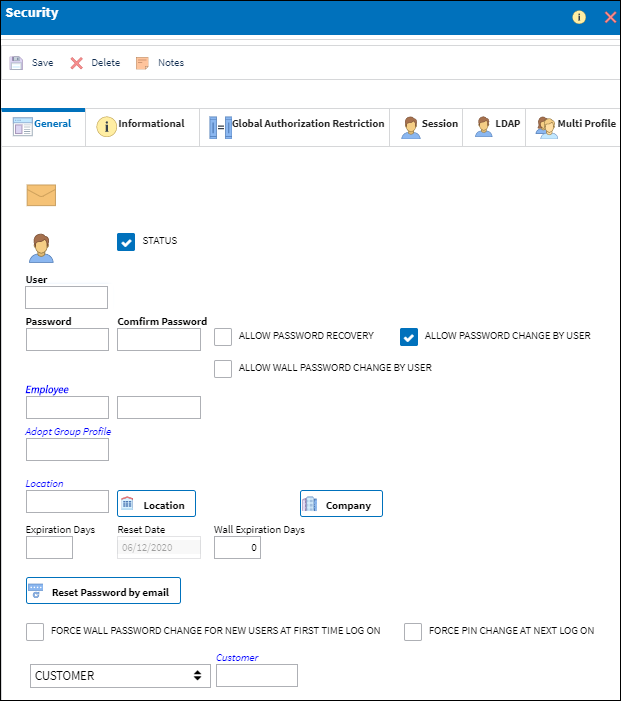
Note: If creating a new user, the Security window appears as displayed above (with no existing user information). If updating an existing user's profile, that user's information will be displayed.
The following options are available in this window:
_____________________________________________________________________________________
User ![]() / User Group
/ User Group ![]() icon
icon
The User ![]() icon signifies a single user profile while the User Group
icon signifies a single user profile while the User Group ![]() icon indicates a group profile. The User Group icon is displayed when the Group Profile checkbox is selected or when an existing Group Profile is being updated.
icon indicates a group profile. The User Group icon is displayed when the Group Profile checkbox is selected or when an existing Group Profile is being updated.
Status checkbox
Select this checkbox to indicate that the employee is active. When not selected, the User is considered inactive. When inactive, the Status ![]() checkbox is displayed in red and the User
checkbox is displayed in red and the User ![]() icon is crossed out in red. Inactive users cannot log on to eMRO. This checkbox is selected by default.
icon is crossed out in red. Inactive users cannot log on to eMRO. This checkbox is selected by default.
User
The employee's username. When creating a new user, this username must be created for the employee. Once saved, this field cannot be changed. When updating an existing user, this field cannot be updated.
Note: System Administration Switch ![]() SECMID sets the minimum number of characters that a username must contain. For more information refer to the System Administration Switches Manual.
SECMID sets the minimum number of characters that a username must contain. For more information refer to the System Administration Switches Manual.
Group Profile checkbox
The Group Profile checkbox must be selected in order to create a new Group Profile. The checkbox is only available when the Security window is accessed through the New User ![]() button or when an existing Group Profile is updated. Once selected the following fields are not available: Password, Employee, Adopt Group Profile, Reset Date, and Wall Expiration Days. When selected, the Profile Description and Session Group fields become available. The User
button or when an existing Group Profile is updated. Once selected the following fields are not available: Password, Employee, Adopt Group Profile, Reset Date, and Wall Expiration Days. When selected, the Profile Description and Session Group fields become available. The User ![]() icon also changes to the Group
icon also changes to the Group ![]() icon. For detailed information on the Group Profile functionality, refer to the Group Profile Checkbox.
icon. For detailed information on the Group Profile functionality, refer to the Group Profile Checkbox.
Allow Password Recovery checkbox
Select this checkbox to provide the user with the password recovery functionality.
Password
The user's individual log-on password. A user can change their own password if the Allow Password Change By User checkbox is selected (below). This field is not available when the Group Profile checkbox is selected.
Note: Password requirements are defined by the following System Administration switches:![]() SECMPAS - Security Password Minimum Number of Characters.
SECMPAS - Security Password Minimum Number of Characters.![]() SECMALP - Security Password Minimum Number of Alpha Characters.
SECMALP - Security Password Minimum Number of Alpha Characters.![]() SECMNC - Security Password Minimum Number of Numeric Characters.
SECMNC - Security Password Minimum Number of Numeric Characters.
Allow Password Change By User checkbox
Select to allow the user to be able to change their own password.
Allow Wall Password Change By User checkbox
Select to allow the user to be able to change their own Wall password.
Note: With the Allow Wall Password Change by User checkbox selected for the user, when an employee under this user profile logs in to eMRO using their Wall Password credentials, they can change their Wall Password themselves through the User Password Settings button in the main Dashboard of eMRO. For more information regarding Wall Password functionality, refer to Applying Wall Passwords.
Employee
The user's employee name. The employee name must first be created in the Employee Master. This field is not available when the Group Profile checkbox is selected.
Adopt Group Profile
Enter the Group Profile that the user's security access will be copied from (optional). For detailed information see the Adopting a Group Profile section below. This field is not available when the Group Profile checkbox is selected.
Note: If after a group profile is adopted and changes to the user's securities are made, if the user profile is modified in any way and re-saved, the group profile's security settings will be re-applied to the user's profile. Once the group profile is revalidated, any additional security changes that had been made to the user's profile will be reverted to the group profile's settings.
Note: For more information on adopting multiple group profiles, refer to the Security, Multi Profile Tab.
Profile Description
Allows administrators to provide a description of the group.
Note: This field is only available when the Group Profile checkbox is selected. For more information refer to the Group Profile Checkbox.
Location
The default Location for the user. This will automatically populate the Location field on windows that require the Location. The selection made here will be the only Location option available for this user/group throughout the system. (For example, this user/group will only be able to create or query for W/Os for this Location.) To add multiple locations to the profile, refer to the Additional Location ![]() button (below).
button (below).
Note: User Profiles that adopt a Group Profile (see Adopt Group Profile above) cannot have a different Location than the Group Profile. The Group Profile's Location will override the individual user profile's Location.
![]() Note: From version 7 and onward, this field has been removed and the Location
Note: From version 7 and onward, this field has been removed and the Location ![]() button will be used in its place.
button will be used in its place.
Location ![]() button
button
Click this button to select multiple locations for the user/user group profile. The selections made here will be the only Location options available for this user/group throughout the system. (For example, this user/group will only be able to create or query for W/Os for these Locations.)
![]() Note: From version 7 and onward, the Location
Note: From version 7 and onward, the Location ![]() button will be used in place of the location field.
button will be used in place of the location field.
Company ![]() button
button
Click this button to select one or more companies for the user/user group profile. The selections made here will be the only company options available for this user/user group throughout the system; in other words, the user/user group will only be able to create or query records for the companies selected.
Note: This button is part of the Company Multi functionality. If the operator utilizes only single company record, then that should be the only record selected here. For more information, refer to the Multi Company functionality.
Expiration Days
The number of days that the Log-in Password (above) will expire after the Reset Date.
Note: User Profiles that adopt a Group Profile (see Adopt Group Profile above) cannot have a different Expiration Days value than the Group Profile. The Group Profile's Expiration Days field will override the individual user profile's Expiration Days field.
Reset Date
This date is the starting point for the user's password. The individual user's password will be expired once the amount of Expiration Days (above) is reached. The Expiration Days period begins on this Reset Date. This date applies to the user's Log-in Password and their Wall Password. This field is not available when the Group Profile checkbox is selected.
Wall Expiration Days
The number of days that the Wall Password will expire after the Reset Date. This field is not available when the Group Profile checkbox is selected.
Reset Password by Email ![]() button
button
Select this button to send the user an email to reset the password to the system.
Force Wall Password Change for New Users at First Time Log On checkbox
Select this checkbox to make a password change mandatory the next the time the user logs on to the group's Wall.
Customer/Vendor drop down
This drop down selection will determine if the employee has security access to log in to the Customer Portal as a customer or a vendor. If the customer option is selected, the customer code must then be defined to allow the employee to access that customer's profile via the Customer Portal. Similarly, if the vendor option is selected, the vendor code must be defined to allow the employee to access that vendors profile via the portal.
Customer
The Customer Code which the user is associated to. When this is specified, the customer's Inventory Owner will be defaulted in the Owner field of the Inventory Transaction, Inventory Supervisor, and Inventory Query windows. The Inventory Owner is set up in the Customer Master, General tab. For more information refer to the Settings Training manual. In addition, this Customer Code will provide the employee access to that customers profile via the customer profile.
Vendor
The system code for the service/part provider. Vendor Codes are set up in the Vendor Master, General tab. For More information, refer to the Settings Training manual. In addition, this Vendor Code will provide the employee access to that vendors profile via the vendor profile.
Force PIN change at next Log On checkbox
Select this checkbox to make a PIN change mandatory the next time the user logs on to the system. For more information regarding the setup of the Employee PIN (Personal Identification Number) functionality, refer to the Enroll Badge Button, via the Employee Master in the Settings Training Manual.
_____________________________________________________________________________________
Select the Save ![]() button to save all user information.
button to save all user information.
Share
Print
|
©1997-2024 Trax USA Corp. All rights reserved. This manual may not be copied, photocopied, reproduced, translated, or converted to any electronic or machine-readable form, in whole or in part, without prior written approval from Trax USA Corp. |
|