
 Share
Share
 Print
Print
|
|
|
|
|
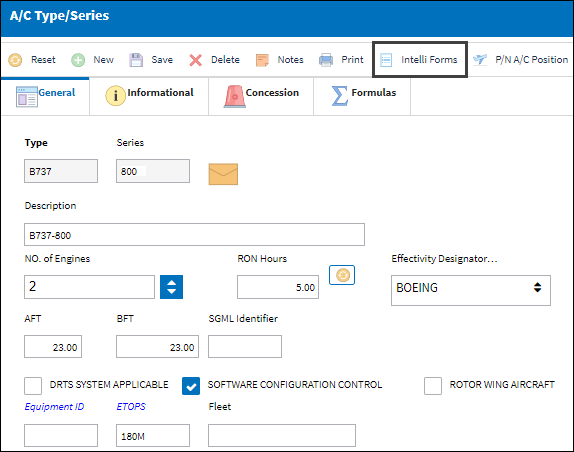
The Intelli Form ![]() button allows the user to create form records and upload images for each A/C Type Series as required. The forms can then be used to map dents associated to defects in the Dent Mapping window at a later time. For additional information, refer to Dent Mapping via the Technical Records Training Manual.
button allows the user to create form records and upload images for each A/C Type Series as required. The forms can then be used to map dents associated to defects in the Dent Mapping window at a later time. For additional information, refer to Dent Mapping via the Technical Records Training Manual.
Select the New ![]() button to create a new form record. Populate all mandatory and desired information.
button to create a new form record. Populate all mandatory and desired information.

![]() Note: Users can upload 3D models of an Aircraft to an eMobility for each A/C Type/Series using .obj files. The 3D model must be uploaded as a .obj file and the Form Type Transaction Code for the import must be 3D IMAGE. The Aircraft model will then appear in the Dent Mapping window via QuickTurn or PilotLog for the selected Aircraft.
Note: Users can upload 3D models of an Aircraft to an eMobility for each A/C Type/Series using .obj files. The 3D model must be uploaded as a .obj file and the Form Type Transaction Code for the import must be 3D IMAGE. The Aircraft model will then appear in the Dent Mapping window via QuickTurn or PilotLog for the selected Aircraft.
The following information/options are available in this window:
_____________________________________________________________________________________
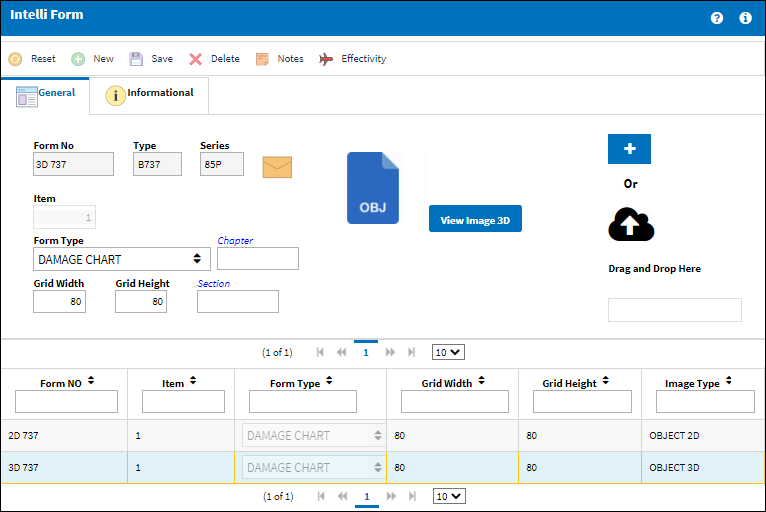
Form No.
The form number.
Type/Series
The Aircraft Type and Series/Fleet assignment.
File Type ![]()
Select the Upload 2D File or Upload 3D File radio button to indicate what image file type is being uploaded (this functionality has been updated in version 7 of eMRO).
![]() Note: The 3D image must be loaded as a .glb or .obj file format. A 3D image allows the user to manipulate the image orientation via the Dent Mapping window.
Note: The 3D image must be loaded as a .glb or .obj file format. A 3D image allows the user to manipulate the image orientation via the Dent Mapping window.
Item
The item number.
Form Type
Select the form type (E.g., DAMAGE CHART, COCKPIT, 3D IMAGE, etc).
Load Image ![]() button or Drag and Drop Here
button or Drag and Drop Here ![]()
Drag and drop the desired file into the window or select the Load Image ![]() button to search for a file to be associated with the record.
button to search for a file to be associated with the record.
Note: Users may load multiple images at the same time in jpeg, bmp, png and jiff format.
![]() Note: A 3D image files must be loaded in .glb or .obj format.
Note: A 3D image files must be loaded in .glb or .obj format.
Chapter/Section
Populate a Chapter/ Section checkbox to make the image(s) effective to a specific aircraft. When the user queries for an aircraft, chapter and section in the Query Area via the Dent Mapping window, only the images set up with the same chapter/ section will appear in the Image Area. If the Chapter/Section is not setup via the Intelli Form window, images for all chapter/ sections will appear. For additional information, refer to the Dent Mapping section via the Technical Records Training Manual.
Grid Width/Height
The grid width/height of the form. This is the number of horizontal and vertical columns specified in the background table of the Work Area, via Dent Mapping. The grid dimensions will determine how large/small a dent will appear in a form. The smaller the dimensions (e.g. 8x8, the larger the dent.
Note: The standard width/height is 80x80.
View Image ![]() button
button
Select the View Image ![]() button and a preview window will appear displaying the image associated to the record.
button and a preview window will appear displaying the image associated to the record.
Note: In the below screenshot, a 3D .obj image file has been uploaded; if a record with a 2D image is selected, the button would appear as ![]() .
.
_____________________________________________________________________________________
The following can be utilized for additional functionality:
Share
Print
|
©1997-2024 Trax USA Corp. All rights reserved. This manual may not be copied, photocopied, reproduced, translated, or converted to any electronic or machine-readable form, in whole or in part, without prior written approval from Trax USA Corp. |
|