
 Share
Share
 Print
Print
|
|
|
|
|
The Import ![]() button appears throughout the system and is used to quickly import files that do not exist in the system. The same process can be applied to any import found within the system.
button appears throughout the system and is used to quickly import files that do not exist in the system. The same process can be applied to any import found within the system.
The Import ![]() button, via Customer Contract is used to quickly import Customer Contracts that do not exist in the system.
button, via Customer Contract is used to quickly import Customer Contracts that do not exist in the system.
First, the user must prepare the file. For information regarding how to prepare the import file, refer to Preparing File For Import, via the Import Button of the System Standards Training Manual.
Note: Import files for eMRO should be saved as .csv (comma delimited) or .xlsx and cannot have spaces in the title of the file. Spaces in the file path will cause errors when importing.
Criteria for Parts and Tools Import file:
Column Name |
Data Type |
Limitation |
Path |
P/N |
Alphanumeric |
25 |
Production/Update/Customer Contract, Shop Approved P/N tab. |
Repair Code |
Alphanumeric |
8 |
Production/Update/Customer Contract, Shop Approved P/N tab. |
Flat Rate checkbox |
Y/N |
1 |
Production/Update/Customer Contract, Shop Approved P/N tab. |
Flat Rate |
Numeric |
13 |
Production/Update/Customer Contract, Shop Approved P/N tab. |
TAT |
Numeric |
5 |
Production/Update/Customer Contract, Shop Approved P/N tab. |
Go to Production/ Update/ Customer Contract. Select the Import ![]() button.
button.

Complete all of the Import steps.
For information regarding how to Import a file, refer to Importing a File via Import Button of the System Standards Training Manual.
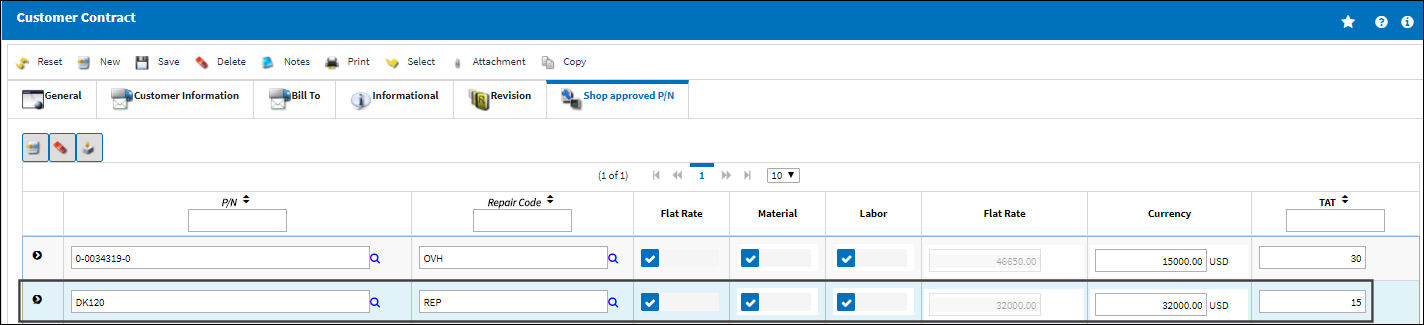
After the import has been complete, the user may view the Customer Contract, Shop Approved P/N tab to view the imported Customer Contract:
Share
Print
|
©1997-2024 Trax USA Corp. All rights reserved. This manual may not be copied, photocopied, reproduced, translated, or converted to any electronic or machine-readable form, in whole or in part, without prior written approval from Trax USA Corp. |
|